In this article, I’ll teach you some useful FL Studio Mobile tips and tricks to optimize your workflow when producing music.
That’s why I suggest you stick around so you can learn some of my secrets as a producer.
I’ll also show you how to access a series of free tutorials and courses to get you started creating tracks professionally.
See also: 15 Reasons Why FL Studio Is The Best DAW For Music Production
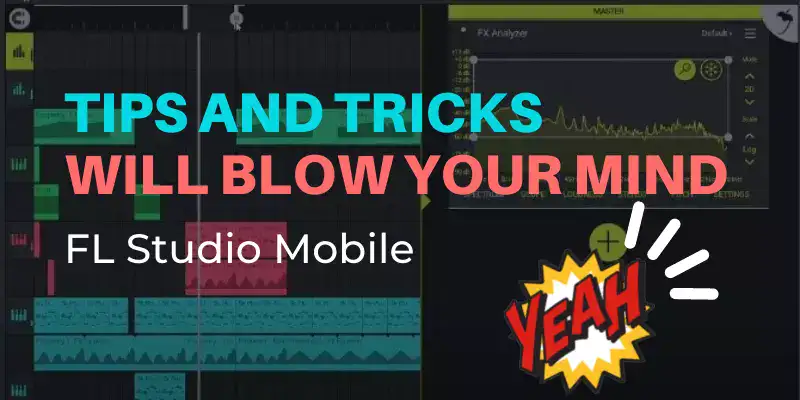
Table of Contents
- Best Tips and Tricks for FL Studio Mobile
- 1) Fix Latency Issues Easily
- 2) Installing PC Libraries into FL Studio Mobile
- 3) Free Tutorials and Courses
- 4) Four Essential Tips For Professional Mastering
- 5) Support Yourself In The Forum
- 6) Enhance The Kicks In Your Beats With Sidechain
- 7) How To Make Automations
- 8) Detect and Edit The BPM
- 9) Convert Any Recording To MIDI
- 10) Manage FL Studio From The Mobile App
- 11) Basic Aspects That Every Producer Must Master.
- FAQs – FL Studio Mobile Tips and Tricks
- Resources
Best Tips and Tricks for FL Studio Mobile
The mobile version of this DAW despite having fewer features and plugins than the PC editions is fully capable of creating high-quality music.
The following tips and tricks that I’m going to cover below are very useful to make your music productions sound more professional.
So if you are a beginner these will help you to develop the skills and abilities of an elite producer and increase your workflow when using FL on your smartphone.
Undoubtedly, it is worth buying this product, as it has a fairly cheap price compared to all the benefits it provides.
Get FL mobile 3 for:
1) Fix Latency Issues Easily
It is quite common that many users when trying to create a beat experience slowness and lag in the FL Studio mobile interface.
This is mostly due to the fact that the devices used are of a modest range and have limited processing resources.
In addition, the more complex the track is and the more sound effects it has applied, the higher the lag will be.
So what you need to do is to optimize the processor performance to increase the smoothness and reduce latency problems as much as possible.
So there is a simple way to improve CPU performance and speed. I explain it below in 3 simple stages:
- Multi-Core Processing: What you need to do is to go to the options menu and enable it. This feature will help you to improve the smoothness and FPS while you are working on your music project.
- Ultrasafe Sound Mode: Switching to this mode in the main menu will help you get even more out of the phone’s processor and reduce stutter.
- Battery Saver: I suggest disabling the smartphone’s power-saving plan through its internal options. Doing this will send more juice to the CPU to speed up its work, but it will drain the battery faster.
See also: Discover What Famous Songs Were Made On FL Studio
2) Installing PC Libraries into FL Studio Mobile
It is well known that the mobile version of this DAW is somewhat limited and does not have as many libraries as the PC editions.
That’s why I want to show you the following hack with which you will be able to use in your cell phone the custom sound sample libraries that you have in the PC version.
Also with this procedure, you will be able to use almost all the sample packs that you can download from the internet.
First of all, you must have at hand the files you want to add to your smartphone.
Note: For this procedure to work I recommend that all the audio files you add are in WAV audio format.
Method #1
- First, copy the folder that contains the sound library to your phone.
- Select the extract or unzip option on your smartphone in case it is packed in a Zip or Rar archive.
- In the unzipped folder you will see all the files such as snares, hi-hats, claps, kicks, drums, melodies, loops, among others.
- Select them all and copy (or move) them. Then go to the FL Studio folder called FLM USER FILES.
- Finally, paste all the sound files into the MY SAMPLES folder.
- Now, you will have all the sounds ready to be used on mobile, which is awesome.
After this, you will be able to create more complex and higher-quality tracks with FL Studio Mobile.
Just create a new project, press the EMPTY option, set the tempo, insert the necessary instruments, effects and filters.
And just like that, you can use the library of sounds and effects you have on your PC in the FL Studio mobile 3 application.
This way you can expand your resources to create unique beats.
Method #2: Add Songs and Instruments to FL Studio Mobile 3
Here’s another trick, which is a similar method to the previous one, which will allow you to keep adding more samples and instruments to the mobile version of this DAW.
It is also super useful to add songs, edit them or remix them from the mobile, which is a very interesting feature.
See also: How To Add Plugins To FL Studio 20 For Macbooks
Next, I recommend you follow these steps through the File Manager app on your smartphone.
- Download WAV sounds of guitars, drums, pianos, etc. and organize them into folders for each instrument.
- Then, copy or unzip them to the samples folder located in FLM USER FILES.
- Finally, perform a test in FL Studio Mobile, adding a new instrument.
- In that section you will see all the sounds and tracks you just installed organized and ready to be played.
I hope you enjoy these tips and tricks and find them as useful as they have been for me.
3) Free Tutorials and Courses
Fortunately, Fruity Loops for mobile has a lot of free tutorials and courses.
These are posted all over the internet and you can freely access them without having to pay any money.
These lessons have been created by the Image-Line team and you can find them as video tutorials uploaded to the Youtube platform.
I recommend you to watch them because the information contained in them is quite valuable and very well explained.
These tutorials have even more value than many paid courses that many gurus offer.
So take advantage of them, you don’t have to invest anything, just your time.
In my opinion, I think it is the ideal start for beginners to learn the secrets of this application.
Down below, in the resources section of this article, I will leave attached the link to the playlist of this free course, I hope you enjoy it!
4) Four Essential Tips For Professional Mastering
Now I’m going to teach you my four secret tricks to get the best results when mastering my beats with FL on my android phone. So stay tuned!
A) Analyze your tracks from the master with FX Analyzer
Whenever you’re working on a project, it’s always a good idea to check the frequencies behavior of your project with FX Analyzer.
Normally you can use this plugin on any part of the song. However, ideally, you should test it on the drop, which is one of the most important parts of the track.
So add it to the master channel and then go to the spectrogram section of the tool.
Now play your beat and click on the magnifying glass icon to zoom out.
Finally, press the freeze button to be able to check the frequencies in more depth.
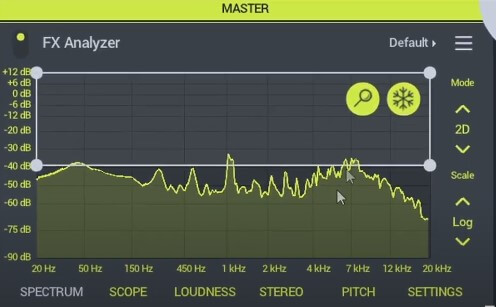
As I show you in the image, when drawing a horizontal line the spectrogram must be balanced.
In other words, there should be a balanced mix between the bass, mid and high frequencies.
Gradually analyze the track to determine if you need to improve any of the frequencies.
This is a good tip to keep in mind if you want your beat to sound great.
See also: Get FL Studio Sample Packs (FREE)
Always try to turn on the analyzer when you are mixing. Also, remember that this representation is just an example and will vary.
It will depend on the genre of music you are working with or if you are going to include vocals.
B) Leveling the volumes in the Mixer
This procedure is very simple and at the same time vital. It basically consists on leveling the volume of each of the channels you are using in the Mixer.
You must analyze and adjust every channel separately within the Mixer interface.
You have to slide the channel bars towards an optimal volume point. The ideal configuration is as follows:
- Instruments: Set each instrument in your mix to the midpoint of the bar and bring them to the same level. On the other hand, the main instrument should be a little above the others.
- Effects: These should be a little below the volume level of the instruments.
- Drums: This is equal to the sum of the levels of all the instruments in the mix already leveled. This is very necessary to give a little more emphasis to the drums, avoiding them to be overshadowed by the other instruments.
See also: FL Studio: Make Unique Like A Pro (Step-by-Step Guide)
It is also important to mention that there is another more advanced and alternative method to this procedure.
It consists of sending all the instruments to the same channel so that they can be controlled as a whole.
This is very practical and great for improving your workflow, especially in more sophisticated projects.
C) Leave room for vocals in your beats
This tip is important to put into practice if you want to be a good music producer in FL Studio Mobile or any other DAW. It is about conditioning your beat to add vocals to it.
Imagine that you are working on a project which you plan to commercialize (sell) or maybe finish in the future, then you must leave it ready to adapt vocals.
You can do this by inspecting the audio frequencies with the FX Analyzer plugin.
With the spectrum analyzer, you must determine which is the ideal space to include vocals, either in the mid frequencies (2 kHz – 4 kHz) or high frequencies (12 kHz – 20 kHz).
This is vital to know how to implement because if you want to add vocals to the mix they have to fit without the need to use dynamic equalization or any other kind of extra processing.
See also: Interesting Facts About FL Studio You Should Know
For this reason, making a correct mix with the right spacing for the vocals avoids negative results such as unwanted distortion while we want to fix this mistake.
In other words, the final result will sound bad.
This mixing principle is applicable in almost any musical genre, except for electronic music, as it is a bit peculiar.
In electronic music, the room for vocals is not necessary, as they are replaced by the leads, which are the main melody.
The only thing that is required is to level the volumes as explained above.
D) Control the decibels of the mix
When you are working on the mix you should never exceed the zero dB level.
In my experience, the best results are obtained when working in the -6 to -3 decibel range.
If you ever exceed 0 dB while mixing you can get unwanted distortion as a result, which will ruin your beat.
5) Support Yourself In The Forum
FL Studio has one of the strongest and most collaborative communities compared to other competing DAWs.
In the forum, you can find support and clear all your doubts related to FL Studio mobile.
Most of the questions are answered by experienced users or by moderators chosen by Image-Line.
There you will find a lot of information that will definitely make you progress quickly.
If you want to learn and advance as fast as possible in music production this is one of the most important advice you can get.
I will leave you the link to the Image-Line forum further down in this post, in the resources section.
6) Enhance The Kicks In Your Beats With Sidechain
From FL Studio Mobile it is possible to emphasize the kicks in a track.
I recommend that you use headphones, so you can distinguish the sounds well and adjust them while following these simple suggestions.
How to make Sidechain:
- Open the music project in which you want to apply Sidechain.
- Then go to the menu by clicking (+) and open a new channel in Effect Track (AUX).
- Now inside that channel you have to add the FX Leveller.
- Next, create an audio clip in that same channel to be able to apply effects to it.
- Adjust the Leveller effects to your needs.
- After the clip is ready, duplicate it and place each of them at the same level (below) each kick in the new channel.
- Next in your melody go to the master channel and choose the Leveller FX you edited before to apply it to your beat.
That’s it, now your track will be more enhanced when the kicks are played and will sound more professional.
See also: FL Studio Copying and Pasting Shortcuts (Speed Up Your Workflow)
7) How To Make Automations
Automations are used to manage the controllers automatically.
These are very useful for working on exported projects since you can’t modify anything once they have been exported, this means that everything is already regulated.
This way you can add effects and instruments as they play and the controllers change automatically as the song progresses.
In FL Studio Mobile 3 it is possible to automate, I suggest you follow these steps:
- Choose an instrument (from the exported track) that you want to edit and add an effect to it such as a cut off, sidechain, FX filter, and so on.
- Then go to the plugins menu.
- Choose a filter (for example)
- Now click on the control you want to automate to select it.
- Then press the CTRL button at the bottom center of the screen and choose Add Automation Track.
- A track will then appear below the instrument,
- And the next thing to do is to add a clip, which will be used to draw and adjust how the effect will be controlled.
- Now, trace how the effect will sound according to what you need for your beat.
- Then, increase the automation curve little by little.
- Finally, you should draw the trace downward to give a fading sensation to the effect you are automating. That’s it!
Now you will see that when you play the song the controls will move by themselves and apply the effects in an automated way according to what you have programmed.
This functionality is quite useful and has multiple applications, you can even perform it on the vocals.
Considerations:
For all this to look as professional as possible, it is advisable to draw the effect from the bottom to the top. This will make the sound come in progressively.
What you draw at the bottom of the graph will sound with low volume. On the contrary, the higher the trace is, the louder it will sound.
You must avoid at all costs that it sounds very loud and abrupt at the beginning.
Do not turn it up all at once, do it little by little to get better results.
Additionally, you should keep in mind the beats, where they start, and where they end.
You can easily identify them by the numbers at the top of the automation chart.
Each number corresponds to the moment where a beat appears.
See also: FL Studio vs Reaper - Comprehensive Guide
8) Detect and Edit The BPM
It is well known that FL Studio Mobile, at least in the current versions, does not have an option to edit the BPM in a precise way, it means to determine the tempo of a song.
Knowing how to adjust the tempo is vital in music production so that you can use sounds on a song and make them go according to its rhythm, which means, neither too fast nor too slow.
Now, you can get to perform this action by means of an external application called Music Speed Changer.
I love this feature because I can remix my favorite songs to my preferences from my cell phone.
You can download this app for free from the Google Playstore. Check out how easy it is.
How to detect and edit the BPM:
- Go to Music Speed Changer.
- Now with the app, find the song in your mobile files that you want to know the tempo. This is possible through the folder icon.
- Go to the options menu (in the three dots in the upper right corner) and enter the Settings.
- Scroll down the list of options.
- Then, locate and enable the PPM option, which is the same as BPM.
- After that, move the percentage bar of the track, which will change its BPM.
- Next, save the track with the new settings to your smartphone.
- Now, open FL Studio Mobile and load the file you just saved.
- Later, in the DAW, set the tempo according to the speed of the song.
- Finally, quantize the track according to the beats of the track to make it sound professional.
Music Speed Changer is a highly recommended application. Thanks to it, you can also edit pitch and tempo separately.
On the contrary, in FL Studio Mobile the only way to control the speeds is via the Pitch.
This is not very practical, since this method indirectly changes the tone of the song, something that is awful.
Saying it in other words, you can’t change the tone without affecting the tempo.
Another negative aspect of FL Studio for mobile, which they should improve, is that it does not quantize automatically.
So, this is a procedure that has to be done manually and square it according to the rhythm of the beat.
9) Convert Any Recording To MIDI
If you want to know more about MIDI, it is a digital interface that allows different musical instruments to synchronize with each other.
See also: How To Use Maschine as a MIDI Controller In FL Studio 20
Therefore, with FL Studio you can transform any sound to MIDI, be it piano, drums, guitar or recording, with the option of applying any VST plugin to improve the audio.
But if you don’t know how to do it, I recommend you try these simple steps that have worked very well for me.
How to convert audio to MIDI signal:
- Press on screen the track you want to transform to select it.
- Slide your finger on the sound spectrum and then click on “EDIT” (an audio editor).
- Click on the tool symbol and choose “CONVERT TO SCORE AND DUMP TO PIANO ROLL“.
- This will convert your audio to MIDI notes.
With these simple steps, you can use any sound generated by your plugins and transform them into a MIDI signal.
10) Manage FL Studio From The Mobile App
In music production with this DAW, you can use an App developed by Image-Line that allows you to manipulate FL Studio for computers from your smartphone.
For example, with the app, you can control the MIDI keyboard or run the piano roll and mixer, adjusting their volumes and managing the play, pause, stop or record buttons.
It’s really easy to use:
- Download the App from the app store, either Android or iOS.
- Use the same wifi network on your mobile and computer.
- Then go to FL Studio, options, “MIDI” and check the box “RUN IMAGINE LINE REMOTELY“.
11) Basic Aspects That Every Producer Must Master.
During all these years as a beatmaker, I have learned a series of techniques that are essential to creating tracks with the best possible sound quality.
These concepts are generally applicable to any music software, no matter the brand or interface.
Also, such tips are useful to put into practice even when we are working on our mobile devices.
So now I will name a list of things you should do or avoid in your tracks:
- Reduce the number of plugins: Take into consideration that if you overuse sound effects in a beat the more quality it will lose. Always try to limit yourself to what is necessary, without exaggerating in the amount of plugins used.
- Use good quality samples and synths: Using quality sounds will always help to make everything easier, since this way you have to work less to polish sound details.
- Avoid the abuse of equalization, compression and distortion: The more you tweak the track, the less original it will sound and the more you will get an unwanted result.
- Optimize the stereo of your mix: To obtain the best possible quality try to mix with and without headphones. Also play it through speakers, your cell phone, computer or ask your friends how it sounds. This is very useful to evaluate the final result from several points of view and improve the details.
If you have any tips or tricks that you personally use to get better results in music creation, you can share them in the comments, so we can all learn.
See also: Is FL Studio Good For Recording Music? Ultimate Guide
FAQs – FL Studio Mobile Tips and Tricks
Can you make good music with FL Studio Mobile?
The short answer is yes. The mobile version of this digital workstation is equipped with good plugins and sound libraries with which you can produce excellent quality music of any genre.
Is FL Studio good on mobile?
Definitely yes. This software is very good even though it is for Smartphones. You can create varied and quality music with the stock tools that come with the application.
Can I sell music made with FL Studio Mobile?
Yes, of course you can. All the music you create in this software can be sold without any problem.
The only requirement you need is to have a license for this product. If you don’t have it, it is not advisable to sell your beats to avoid legal problems.
See also: How To Get Omnisphere 2 VST Plugin on FL Studio 20