Maschine is one of the most powerful tools in professional music production and when combined with FL Studio you can create incredible projects if you know how to take advantage of its features.
In order to use FL Studio with Maschine as a MIDI keyboard we need to pair them and this is possible by mapping the Maschine controls using the FPC (Fruity Pad Controller) and in this way assigning specific functions to each pad controller according to our needs.
This software is not considered a Digital Audio Workstation, although with its capabilities you can obtain results very similar to those of a conventional DAW. It allows us to sequence patterns, create melodies, arrangements, rhythms, and harmonies, among many other things.
Also see: FL Studio vs Maschine - Which one is better for you?
I am going to show you how to integrate both music software, how to use it, and how to export sounds from Maschine to FL Studio. If you want to take advantage of the full potential of Maschine Jam and you don’t know how, stay in this guide and I’ll show you, so you can use it like an expert.
Table of Contents
- How to install and configure Maschine VST plugin with FL Studio
- How to integrate Maschine as a MIDI keyboard in FL Studio 20
- How to use Maschine with FL Studio 20
- How to use Maschine Mikro MK3 with FL Studio 20
How to install and configure Maschine VST plugin with FL Studio
Normally when we install Maschine software on our pc it includes 2 components that will help us to improve its performance and versatility: the application itself and the VST.
This software has the virtue that it can be used as a workstation itself, without the need to use other additional software.
While on the other hand, the VST element can be used as a third-party plugin in association with almost any Digital Audio Workstation, a fact that is itself known as a VST instance.
This means that we can use Maschine integrated inside another music production DAW such as Ableton Live, FL Studio, Pro Tools, Logic Pro X, or the software of your choice. This is a really interesting and useful feature.
Also see: How to use a MIDI controller with FL Studio 20
Here’s how to load Maschine in FL Studio 20:
- Unzip the installer.
- Run it to install the software.
- When the installation process is finished, restart your PC.
- Then locate the path where the Maschine 2 .DLL files are located.
- Your PC > Local Disk (C) > Program Files > Native Instruents > VSTPlugins 64 bit
- Go to FL Studio and in the toolbar click on Add and then More Plugins.
- Then click on the folder icon with the (+) sign to add a new path.
- You must paste that path for Maschine to be recognized and loaded into FL Studio.
- Click on the Find Plugins option
- Wait for everything to load.
- When the process is finished, return to the More Plugins option.
- A window will appear showing a list of all your plugins installed in FL Studio.
- Move down the list, run the Maschine 2 option and wait for it to load.
- Afterward, it will be loaded into the FL Studio Channel Rack.
- Done, it is now loaded as a 3rd party VST plugin.
Note: Avoid adding the path where the Maschine .EXE file is located, as it is not recognized by FL Studio as a VST plugin.
If you haven’t used this software yet, I recommend downloading the trial version provided by Native Instruments on their official website, which is available for Windows and macOS. This way you can see if you like how it works and get more out of it.
Get started learning the basics, and then when you feel ready you can purchase the paid version of this powerful plugin.
How to integrate Maschine as a MIDI keyboard in FL Studio 20
After having installed it as a VST and in the correct path, it is time to continue with the association process, so that both software can be used together and in harmony.
To open this software in FL Studio is very easy, just follow the same procedure as if you were going to load an ordinary plugin.
It is important to know that in this way we are loading it as a conventional plugin. This means that it will be one hundred percent connected to FL Studio and ready to take full advantage of all its features.
Also see: How to install FL Studio on Linux
Configuring Maschine as a MIDI controller in FL Studio 20
This setup process does not require any advanced knowledge, just basic notions of FL Studio, a connector cable (MIDI or USB), and following this guide is more than enough.
This way you will be able to use your Maschine as a MIDI keyboard fully compatible and functional with Fruity Loops.
- The first thing you should have on hand is a compatible connector cable.
2. Connect it to your Maschine device.
3. Then on the back of your pc connect the other end of the cable to the sound card or a USB port on the motherboard (depending on your hardware).
4. Wait for the drivers to be installed so that it is recognized by the operating system.
5. Restart your computer and open FL Studio 20.
6. Next, open the MIDI window and make sure FL Studio detects Maschine.
7. Also, you have to turn that device on in the input and output sections, respectively.
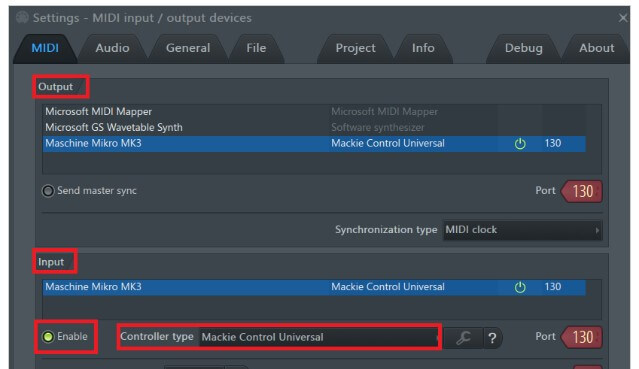
8. In that same window, check that Controller Type is turned on and make sure that the correct port is selected.
9. Next, open the FPC (Fruity Pad Controller) and go to the MIDI Note section.
10. Click on Map Notes for Entire Bank to start assigning the pads.
11. Now click on the Maschine pads that you want to route with FL Studio.
12. Verify that the MIDI note that is recorded when you press a pad is equal to the values displayed by the Sound Desing tab located at the top left of the Fruity Loops toolbar.
13. Finally, when you are done assigning the controls you want to use, stop the process by clicking Cancel Map Notes for Entire Bank.
If you want to learn more about the subject or have any doubts, I recommend you to see the guide where I explain everything related to How to use a MIDI keyboard in FL Studio 20 in more detail. It is a very complete post, where I explain the whole process step by step. So I recommend you to read it.
Also see: How to Install FL Studio on Chromebooks
How to use Maschine with FL Studio 20
This application is very useful as an accessory tool to produce great and well-elaborated music tracks. It will undoubtedly help you get more out of FL Studio and create better sounds.
Now I will show you in a general way, some of the different methods you can use this tool after it is routed with FL Studio 20.
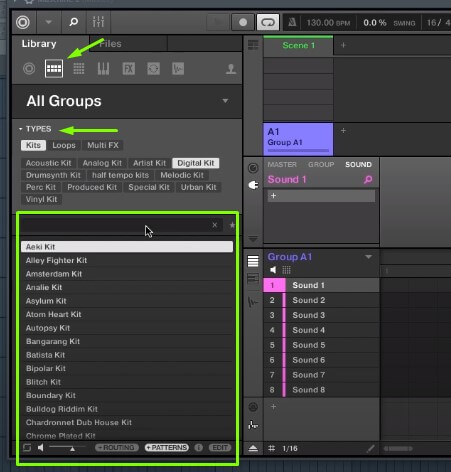
Load group
For loading sounds, you should go to the Maschine library. There you will see a large list of sound effects, percussions, and harmonies. Depending on the type, you can choose the kit, loops, or sound FX that best suits your project. A wide variety of sounds will be loaded, ready to be used.
Tempo
You can modify the BPM to your liking in the FL Studio toolbar, and you will notice that by increasing or decreasing the Tempo of Maschine or Fruity Loops they have been automatically linked.
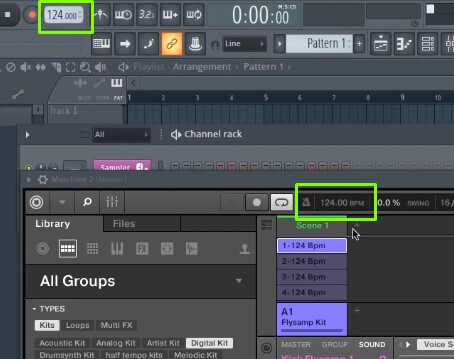
This way we can control both tools at the same time and from a single button.
How to export from Maschine to FL Studio 20
Learning how to export sounds from Maschine to FL Studio is very important. This will allow us to expand our opportunities to create wonderful projects with unique sounds.
This software has a large library with very well done sound effects and a very fascinating detail is that we can also use it as an element in combination with another sound plugin in FL Studio.
Below, I show you the different scenarios where you can use the exportation of audio and MIDI files.
Exporting audio from a MIDI file
- The first thing you should do is go to the Maschine Library.
2. In All Groups, select the Kit you are going to use.
See also: FL Studio: Make Unique Like A Pro (Step-by-Step Guide)
3. Now go to the Maschine playlist and select the MIDI sound effect to export.
4. Right-click on the number next to the kit name to select it.
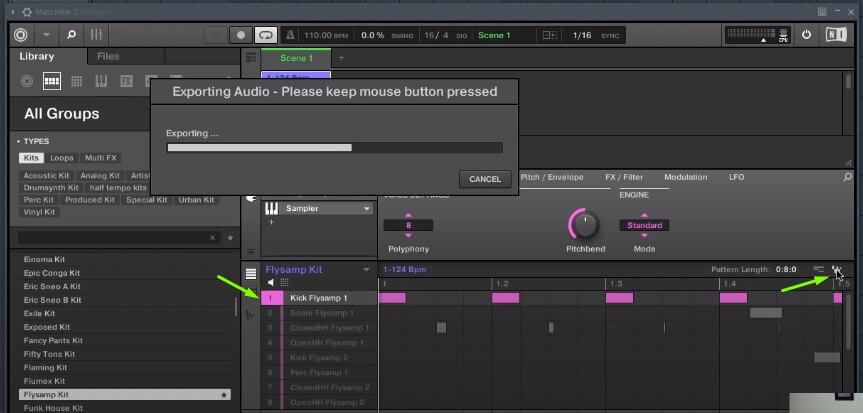
5. Then go to the right side of the playlist bar, left-click on the Wave icon.
6. A progress window will appear saying that the audio track is being exported.
7. Wait until the MIDI signal is transformed (converted) into an audio track.
8. When the process is complete, without releasing the left click, drag the track to the FL Studio 20 playlist.
9. That’s it, you have now exported your MIDI file for use in Fruity Loops.
If you want to continue exporting audio effects to FL Studio, just repeat the above steps as many times as you want.
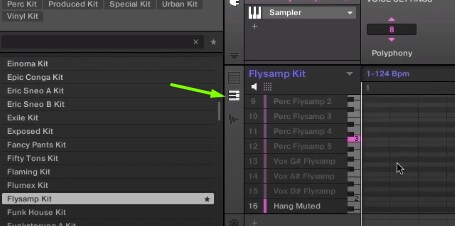
If you want to listen to all the exported sounds, just mute the group in Maschine’s scene section by unselecting it. Then move to the FL Studio playlist and hit play. This process is very simple and requires little practice to learn.
Also see: How to use the FL Studio Soundgoodizer
Exporting a MIDI file
If you want to export your melodies as is, without having to convert your MIDI file, just follow a process very similar to the one above.
Repeat each step exactly as above, but instead of selecting the Wave icon, choose the MIDI symbol on the left side of it.
Now drag your tunes to the place where you want to use them, either in Fruity Loops Studio or on some other VST plugin. That’s all!
Exporting MIDI to another VST plugin from Maschine
Many times we want to use another third-party synthesizer in our music project, which is totally possible to use in association with Maschine and FL Studio.
- Open FL Studio 20’s Channel Rack and load the plugin you want to use.
- After it is loaded, minimize its window.
- Now select the Channel Rack channel where it is hosted.
- Go to the Maschine Library and enter its Piano Roll mode.
- Then select the sound effect by right-clicking on it.
- Go to the MIDI icon mentioned above and drag it onto the synth plugin you loaded earlier in the Channel Rack.
- That’s it!
Now you will be able to use all the Maschine Jam tunes you want with any synthesizer. You will be able to use both audio and MIDI elements.
I also want to mention that you can choose an audio format file instead of MIDI format and export it to the synthesizer you are going to use following this same process in an identical way.
Only this time we will have to convert the sound effect from MIDI to audio by keeping the left mouse click pressed on the Wave icon until the file is processed and converted to a new format.
How to use Maschine Mikro MK3 with FL Studio 20
In the video below you will learn a different method of how to use and map Maschine MK3 correctly.
I also leave you the link so you can get a free Maschine MK3 mapping template, which has been provided at the official Native Instruments forum. Enjoy it!
Also see: Best open source DAWs - free alternatives to FL Studio
Remember that this tutorial is fully compatible with the following MIDI controllers developed by Native Instruments:
- Maschine
- Maschine Mikro
- Maschine MK2
- Maschine Mikro MK2
- Maschine Mikro MK3
Read more about it here.