Fruity Loops is an amazing music production software and is widely used by macOS owners. However, on many occasions, it is very difficult to find quality guides that make it easy to use. That’s why in this post I’m going to show you how to install and add VST plugins in FL Studio 20 for MacBooks.
In order to add a plugin in FL Studio 20 for macOS devices, you have to install it as a VST instance, then using the Find Plugins option add it to your plugin library. After that, upload it to the Channel Rack so that it can be associated and used in combination with FL Studio as a third-party plugin.
Also see: Easy Way To Get FL Studio 20 For macOS (For FREE)
This installation process is very similar to installing on the Windows operating system. Stay tuned for this tutorial and I will show you how to install it in a practical and easy way.

Table of Contents
- Step #1 Installing VST plugins in FL Studio for Mac
- Step #2 Adding VST plugins in FL Studio for macOS
- F.A.Q.
Step #1 Installing VST plugins in FL Studio for Mac
Let’s take as an example the installation of the ANA 2 plugin.
The first thing to do is to have at hand the synthesizer plugin you want to install on your MacBook or iMac. Generally speaking, these can be classified as generators, effects, and samplers.
Normally the plugins are packaged in a DMG Audio, whose formats can be VST, VST3, Audio Units, AAX. When extracting it we can see that in its content it has the documentation and the different versions compatible with macOS and Windows.
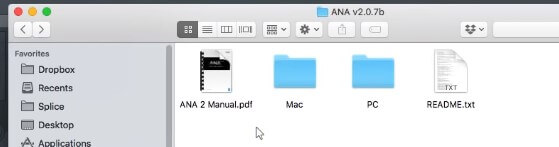
It is important to mention that the AU format is the format that makes them compatible with the macOS operating system.
Choose the plugin for macOS that has a .pkg extension and double-click it to run the installation process. Click continue as needed, and accept the legal and privacy conditions of it.
Where to install the VST plugins?
After that, click the install button to start the process. If you like you can change the installation path on the hard disk or simply use the default one.
See also: FL Studio: Make Unique Like A Pro (Step-by-Step Guide)
If you get a pop-up window asking for username and password, you must enter the credentials with which you log into your macOS computer to continue with the installation.
Wait a few minutes for the installation to finish. After this, we are ready to move on to the next step.
Step #2 Adding VST plugins in FL Studio for macOS
Now let’s continue with what is the association of FL Studio 20 with the VST instance of the plugin. First of all, restart your computer to avoid conflicts before loading it into Fruity Loops.
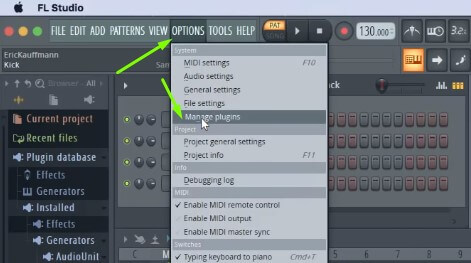
1- Open FL Studio 20 and go to its toolbar.
2- Click Options and navigate to Manage plugins to open it.
3- A new window will open and locate the Find Plugins option.
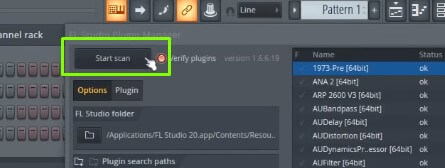
4- Click the scan option to allow FL Studio to locate and recognize it as a compatible VST.
5- If it does not appear, locate the folder icon with the (+) symbol.
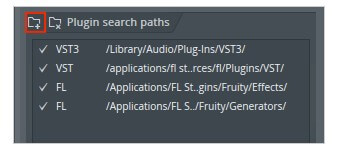
6- Then, add the path where you installed it on your hard drive.
7- The folder should be here: Macintosh HD –> Library –> Audio –> Plug-Ins –> VST.
8- Click the Scan Plugins option again.
9- Wait a moment for the scan to finish.
10- In a few moments you will see a list of your installed plugins.
11- The newly added element will be highlighted in yellow.
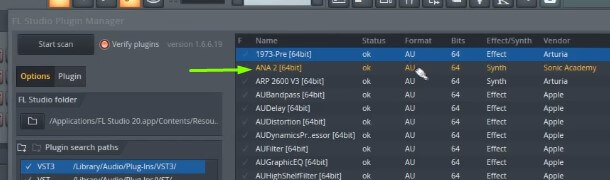
12- Click on the check symbol next to the element name.
13- Then close the current window and go to the Channel Rack.
14- There, click on the (+) symbol and a list of options will be displayed.
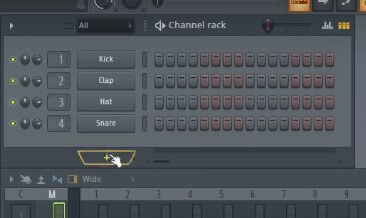
15- Look carefully at the list so that you can locate the plugin you have just added.
16- When you find it, click on it to load it as a VST into FL Studio.
17- That’s it, we’re done!
Also see: How To Use Maschine as MIDI Keyboard In FL Studio 20
Video demonstration:
From now on you will be able to use any VST plugin in FL Studio 20 for macOS.
As you can see it is a very simple process to perform, but the most interesting thing is that this process is pretty much identical to the one to be done in Windows and if you follow the steps in this guide you will be able to configure it there as well.
This article can also be very useful for installing plugins in FL Studio 11 and FL Studio 12.
F.A.Q.
Where do I install plugins on Mac?
When installing a VST plugin on macOS they are hosted by default in the following path on your computer: Macintosh HD –> Library –> Audio –> Plug-Ins –> VST. However, if you want to keep everything more organized you can put them in a folder of your choice when you install them.
How do I import samples into FL Studio Mac?
To import samples into FL Studio you must go to your MacBook’s library. From there follow this path: Application support –> FL Studio –> Bottles –> flstudio –> drive C –> Program Files –> Image-Line –> FL Studio (your version) –> Data –> Patches –> Packs.
How do I install presets in FL Studio 20 Mac?
To install presets in FL Studio 20 for MacBooks, they must be copy and paste into the following path: Finder –> MacintoshHD –> Users –> Users –> Your account –> Documents –> Image-Line –> FL Studio –> Presets –> Mixer Presets –> Mixer Presets. FL Studio is now ready to use the presets.