Nexus is a very powerful synthesizer plugin developed by reFX and because of its great versatility, it is widely used by very famous music producers. This plugin offers presets, expansions, and a magnificent library with which we can create beats of excellent quality.
For installing reFX Nexus in FL Studio 20 it is necessary to have this plugin installed in the PC system disk, specifically in the path where the VST plugins folder is located. Next, in order to add it in FL Studio, we just have to load it as a VST instance in the Channel Rack.
Also see: How to get Omnisphere 2 VST plugin for FL Studio 20
In this article, I will show you everything related to the installation process of Nexus on Windows and macOS, as well as its proper integration with FL Studio.
Table of Contents
- How to add Nexus to FL Studio 20
- How to Import Nexus expansion packs and presets into FL Studio
- How can I get the Nexus 3 plugin?
- Nexus 2 vs Nexus 3 – Which one is better?
- F.A.Q.
How to add Nexus to FL Studio 20
The installation process that I am going to explain below can also be used in FL Studio 12, FL Studio 11, and FL Studio 10. However, you should always keep in mind that the steps to follow may have slight variations depending on the version of FL you use.
Note: This method is fully compatible with Nexus 2 and 3 as well.
Let’s start with the installation of Nexus on Windows systems, and for this, we will need the installer of this plugin. If it is compressed, you have to unpack it in a folder to be able to start the process.
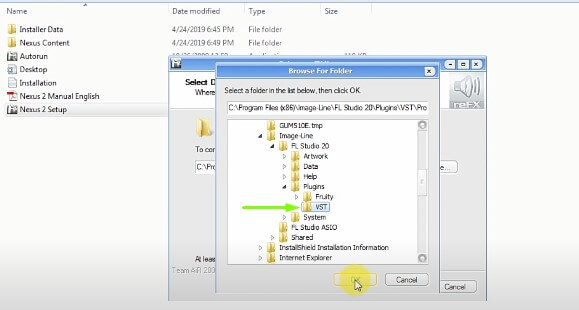
Next, run the installer (Nexus Setup.exe) and a window with the installation wizard will appear. Then, click on the continue button and accept the legal terms of the application. Continue and when you get the option to choose the installation path you must set this folder location:
Local Disk C: –> Program Files (x86) –> Image-Line –> FLStudio 20 –> Plugins –> VST
Also see: How to get FLEX VST plugin for FL Studio (FREE)
Now keep pressing the continue button until Nexus starts installing on your computer. This usually takes a few minutes, be patient as we are just finishing.
At this point, I recommend you restart your PC to reduce the risk of errors.
Loading Nexus as a VST plugin
1- Go to the FL executable and open the DAW.
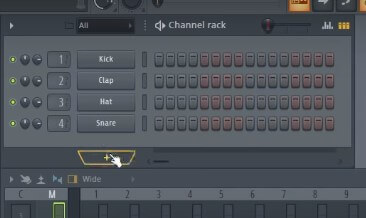
2- Open the Channel Rack and click on the (+) icon.
3- Choose the More Plugins option and then run Manage Plugins.
4- Click on Start Scan so that Fruity Loops can recognize Nexus as a VST.
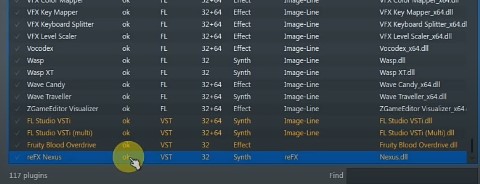
5- Later, a list of all the plugins you have installed in FL will appear on the screen.
6- Scroll down the list until you find the reFX Nexus plugin highlighted in yellow.
7- Mark the check (✔) symbol to pin it as a favorite and close the current window.
8- Now, go to the Browser panel located on the left side of the FL Studio interface.
9- Click on Plugin database –> Installed –> Generators –> VST –> Nexus
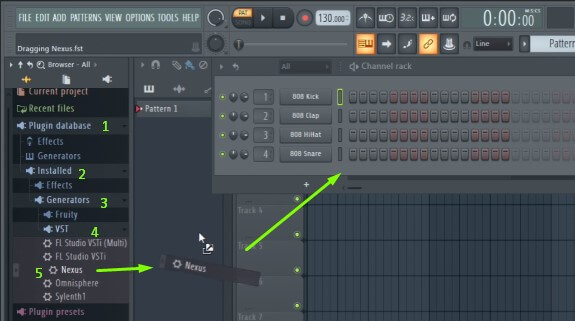
10- Drag Nexus and drop it into the Channel Rack to load it as a VST instance.
11- Nexus will open automatically and you should wait several minutes for it to load completely.
12- Done, now you have Nexus installed and fully functional with FL Studio.
Video demonstration:
Installing Nexus on macOS
For using Nexus on macOS you need to install the plugin on your computer in this path: Macintosh HD –> Library –> Audio –> Plug-Ins –> VST. Then you must add it to FL Studio as a VST instance and then load it into the Channel Rack as a third-party plugin.
Essentially it’s a similar process to the one explained above and you can set it up in a straightforward way.
If you have any doubts, I encourage you to see my post where I explain in more detail and step by step the process of installing plugins on Mac with Fruity Loops Studio.
How to Import Nexus expansion packs and presets into FL Studio
Expansion packs and presets for the Nexus VST plugin are wonderful and really useful to greatly improve our performance when creating unique and sophisticated sounds.
However, knowing the right way to add them is a problem for many users, as they don’t know how to perform this procedure.
Don’t worry I’m here to help you, and I’m going to show you how to import them in a few simple steps.
This method can be done in FL Studio, Logic Pro X, Pro Tools, Reaper, Garage Band, audacity, Ableton Live, Studio One, Cubase, Cakewalk, or the Audio Digital Workstation of your choice.
Just keep in mind that some steps may vary according to your DAW.
Installing Nexus Expansion Packs
1- First unzip the expansion packs you want to import.
2- Open your This PC window and locate the system disk (C).
3- Go to the Program Files (x86) folder and once there go to Image-Line (varies depending on your DAW).
4- Now go to the FL Studio(X) folder, depending on the version you have, and enter into it.
5- Then go to Plugins and inside it, you will find the VST folder.
6- Open it and go to Nexus Content.
7- When you enter, you will see the folder called Presets.
8- Here you have to copy and paste the folders of all the Nexus Expansion Packs you want to import.
9- Close this window and run FL Studio (or your DAW).
10- Load the Nexus VST plugin.
11- Finally, you will see the Nexus Expansion Packs you added appear on the Nexus display.
Installing Nexus Presets
1- Open the main window of your PC and go into the system drive, the C disk.
2- Go to Program Files (x86) and then Image-Line.
3- Now access the root folder of FL Studio 20 (or your DAW).
4- Locate the main Plugins folder and inside it go to VST.
5- Here you have to enter in Nexus Content and then in Presets.
6- In this place, you must unzip or paste the folder containing the Presets to import.
7- Then run your DAW and load Nexus as a VST Plugin.
8- Finally, you will be able to see all the presets loaded in the Nexus screen.
In essence, the Nexus 2 and 3 Presets and Expansion packs should be installed in the same path.
Installing Nexus expansion packs and presets in macOS
Now I will show you how to import them for MacBooks, iMac, and all computers operating under macOS.
1- First open the Macintosh HD window.
2- Once there go to Library.
3- Then go to Application Support.
4- Locate and enter the reFX folder.
5- Move into the Nexus Content folder.
6- Go to Presets.
7- In this location, unzip or paste the folders of your expansion packs and presets to import.
8- Launch your DAW and then load the Nexus VST instance.
9- Now you are ready to use them in the Nexus plugin.
Bonus Tip:
I’m going to show you a shortcut that simplifies this whole explanation.
If you are a Windows or macOS user, enter the main system drive (drive C or Macintosh HD, respectively) and type in the search box the term: Nexus Content.
This shortcut will show you the containing folder (Presets) where you must install your expansion packs and presets.
How can I get the Nexus 3 plugin?
It is very common that when we search on the internet how to get the Nexus plugin we get an infinite number of options in the search results. Most of them are insecure sites, which provide pirated products that on many occasions infect our computers with malware.
That is why I strongly recommend you only download from reputable sites. Avoid downloading pirated plugins, rather buy them.
Nexus software can be obtained through reFX, which is the company that developed it.
Nexus offers 3 editions:
- Starter: This is the simplest version of the plugin. It offers more than 2,700 presets and a good sample library with more than 18 GB of data. It costs 250 USD.
- Value 10: This is the standard version of the product and has a much larger sound library than the previous package. It also includes 10 updated expansion packs, and more than 4,000 presets ready to be used. Its price is around 500 USD.
- Complete: This version is the best of all and also the most expensive, 4,239 USD. If you are a professional producer who always offers your clients the best, this version is ideal for you.
Its package contains more than 154 expansions, and a large number of presets (it includes up to +20,000). Of course, all this comes with a huge sound library with an impressive weight of more than 150 GB.
You can download the Nexus plugin for use in FL Studio 20 here.
For installing Nexus on your computer you will need to have at least 25 GB of free disk storage. Remember, this will depend on the edition you are going to use.
Getting reFX Nexus 3 demo
If you haven’t tried this plugin yet, I recommend you do so. reFX offers a free trial version of Nexus VST, which is excellent. I suggest you try the demo to understand the features it provides.
This way you will know if it suits your needs and do a smart purchase, based on what your projects will require.
Nexus 3 is only compatible with 64-bit systems. In fact most of the products offered by reFX work under this architecture. So first check if your hardware and the other plugins you use, including your DAW, are compatible.
Nexus 2 vs Nexus 3 – Which one is better?
Nexus 3 is the latest version of the plugin and includes some improvements. Among these are a nicer and more intuitive interface, a larger effects library, some of its tools have been improved, including its sequencer.
And best of all, it has backward compatibility with its previous version (Nexus 2), which is great!
Nexus 2 expansion packs and presets can be used with Nexus 3, they are fully compatible. Everything you have stored in the reFX Cloud app can be used without any problems as well.
However, not everything is rosy.
If you already own Nexus 2 and want to upgrade to its latest version, I don’t recommend it, it’s not worth it.
Practically both plugins offer the same, in other words, there are not many differences between them. I suggest you invest your money in something else or another plugin that you need in your collection.
I recommend you to take a look at Omnisphere 2, it is a great alternative to Nexus, very powerful and cheaper.
F.A.Q.
How much does Nexus cost for FL Studio?
Nexus is priced according to the plugin edition:
–Starter: 250 USD
–Value 10: 500 USD
–Complete: 4,239 USD
Is Nexus part of FL Studio?
No, Nexus is not included with FL Studio. Since it is a third-party plugin, it has been created by the company reFX.
Is Nexus worth it for FL Studio 20?
Yes, of course! Using Nexus 3 in FL Studio 20 is absolutely worth it. It can be used as a VST and take advantage of its huge library of sounds, expansion packs, and presets.
Nexus 3 is undoubtedly a good plugin to keep in mind to be used in music production in combination with FL Studio 20.
What’s better Nexus or Omnisphere?
Omnisphere is a much better plugin than Nexus. It comes with a huge amount of presets (+50,000), and a large library of high-quality realistic sounds. It is much more versatile for music creation.
In addition, Omnisphere offers greater customization flexibility and is more affordable in price. Without a doubt, Omnisphere is the way to go.
Do producers use Nexus?
Yes, of course! Nexus is currently used by a lot of famous music producers, especially those who focus on EDM. They choose it because it is a very powerful synthesizer with which you can create high-quality sounds.
Also, I recommend you consult the Nexus 3 manual for more information.