In this tutorial, you will learn how to connect, configure and use a MIDI keyboard in FL Studio and thus sign the knobs, pitch or modulation wheel, buttons, sliders, keys, pads, and other extra functions in a professional way.
A MIDI keyboard or MIDI Controller is nothing more than a keyboard that allows us to manipulate external devices used for music production, such as computers, mixers, drum machines, and synthesizers, among others.
It is useful to control and record the different tools, instruments, and plugins that a Digital Audio Workstation has.
Many DAWs can be controlled and play a wide variety of musical instruments using the MIDI keyboard and FL Studio 20 is no exception.
This process is similar to FL Studio 12, but this one has had some configuration changes over time.
Also see: How to use Maschine as MIDI controller in Fruity Loops
Through this guide, you are going to learn everything you need to know to properly use a MIDI keyboard and a few extra tricks.
So I recommend that you don’t miss this tutorial.
Table of Contents
- How to connect a MIDI keyboard to FL Studio
- How to set up a MIDI keyboard in FL Studio
- How to use a MIDI controller with FL Studio 20
- Final Thoughts
How to connect a MIDI keyboard to FL Studio
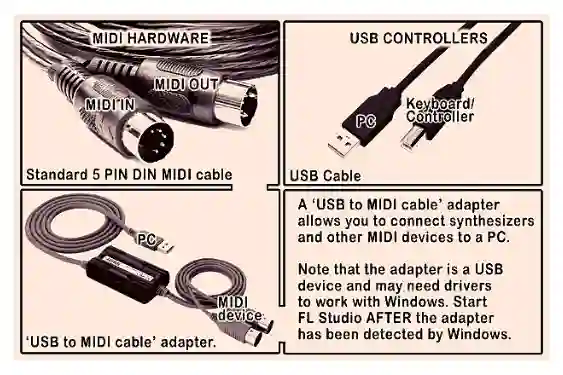
You should keep in mind that there are several types of cable connectors and their outputs can be different.
The most commonly used are the 5-pin MIDI connectors and the USB connector.
Make sure that your computer’s audio card has these MIDI ports available so that it can be connected.
You should also download the drivers for your MIDI keyboard from the manufacturer’s official site or allow the computer’s operating system to install them for you.
The previous step is of vital importance so the MIDI controller can be recognized by the computer that has FL Studio 20 installed.
How to connect your MIDI controller to a computer with FL Studio:
- First, grab the MIDI cable compatible with your keyboard.
- Choose a MIDI port on the back of the keyboard.
- Connect the cable to the MIDI controller and then go to the back of the pc.
- Locate a USB port on the motherboard or MIDI port on the sound card and connect the cable.
- Turn on the MIDI keyboard by pressing the ON button.
- After being connected it will be recognized by your pc.
- Then, the drivers will be installed automatically so the keyboard can be used.
- Finally, restart your computer.
Also see: FL Studio vs Maschine - Honest Review For Buyers
The process of connecting a MIDI controller is very easy and requires no advanced knowledge to achieve.
However, to get the keyboard working, there is still an extra step.
Now, I’m going to show you the next step of this tutorial, the MIDI keyboard set up in FL Studio 20.
Considerations
Nowadays most MIDI controllers can be installed on the computer through the USB port.
First, connect the USB cable to the MIDI keyboard and then connect it to any free USB port on your computer.
Learn how to professionally configure FL Studio and get the highest possible audio quality with my tutorial in a few simple steps.
That’s it, normally you don’t need to install anything else.
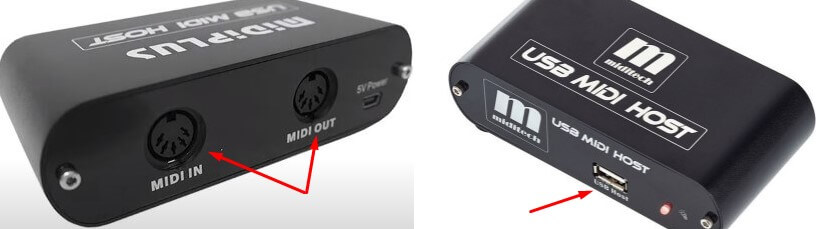
It is important to mention that some of these older keyboards must be connected exclusively to the pc through a MIDI port, which means that for your computer to be compatible it must have a sound card with a MIDI port.
In some stores, you can also get adapters known as MIDI to USB converters.
However, I don’t recommend them, since you lose data during the conversion process, thus obtaining low quality in your notes, and sometimes you can even get wrong notes to the original ones.
For example, you make a C note and you get an E or a different octave, or some functions of the MIDI controller are not detected, nothing good.
The best thing to do if you have an old keyboard with MIDI ports is to get a sound card with MIDI ports, don’t use the converters to avoid these problems.
Also see: Best open source DAWs - Free alternatives to FL Studio
How to set up a MIDI keyboard in FL Studio
The first thing I am going to show you is the right way to set up modern, old and generic MIDI controllers.
Their configuration is very easy to achieve and I’ll explain how below.
Setting up a modern MIDI controller
- After you have your keyboard connected to your computer, turn it on.
- Then, after a few seconds it will be detected and ready to play.
- Now, open FL Studio 20.
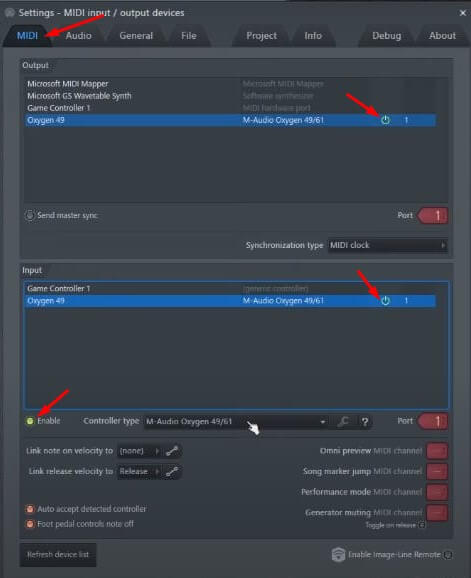
- Open the MIDI settings window (by pressing the F10 key on your PC keyboard), and go to the MIDI tab.
- Go to the Output section, locate the name of your keyboard and select it.
- Scroll down to the Input tab and select your controller.
- Make sure it shows the green icon Enable. If it is off click on it to turn it on.
- Now click on the controller and assign it to the same USB port it is connected to on your PC.
- You should choose the brand of your device in the Type controller option. If it is not possible, set it to generic.
⚠ Important: Your MIDI Controller does not work in FL Studio? Do this to fix it…
Sometimes the MIDI keyboard does not play sound in FL Studio or simply does not work when we install it.
Solution:
This is mostly due to the lack of proper MIDI controller drivers. Update them to correct the error.
It can also happen that the keyboard is not properly configured in the MIDI settings window.
It may not be enabled or selected for the correct port.
See the installation process explained above for its correct configuration.
Also see: How to get FLEX plugin for free - FL Studio
Configuring old or generic MIDI controller
It is possible that if you are using one of these, it will not be detected by Fruity Loops.
So you should go to Controller Type and click and choose the option called Generic Controller.
This way you will have better guarantees that your keyboard will be more compatible and recognized by the DAW.
At this point, I want to make a very special recommendation.
If the brand of your MIDI keyboard, whether modern or old, appears in the Controller Type window, I suggest you select it.
As it comes pre-mapped and this is essential for most of the options to work correctly when you are using it.
With these simple steps, you will have your keyboard ready to be used.
To test it you only have to open the Channel Rack, then select a channel and when you press the keyboard keys you will see that they will register correctly.
Corresponding to what you play with what you hear in FL Studio.
How to use a MIDI controller with FL Studio 20
After you have your MIDI keyboard set up, no extra action is required, i.e., you can play your chords or notes without the need to do any mapping.
Simply all the notes will be recorded directly from your physical keyboard.
Now let’s learn how to use it.
Using Sound Desing
To make sure that everything is working properly and all the pressed notes are being recorded you should pay attention to the tool called Sound Desing, located in the upper left corner of FL Studio.
Sound Desing is very useful because here you can see all the information related to MIDI when you press its keys and it will tell you exactly the note you are playing.
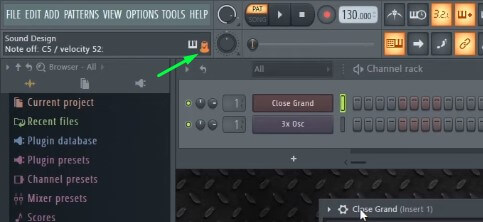
In other words, if you press a note a notification will appear saying Note ON, and when you release it will say Note OFF, thus muting the keystroke.
It tells us Fruity Loops is recognizing all your activities, which is great!
Also see: Interesting facts about FL Studio YOU SHOULD KNOW
How to use Velocity
This VST plugin allows you to measure the intensity parameter with which you are pressing the key.
If you press hard you will get a score of 127 and if you press softly you will get a much lower value.
How to use Velocity:
To activate the Velocity function in FL Studio, just go to the MIDI tab with the F10 key and go to the bottom of the tab.
There is an option called Link Note On Velocity to, click on it and choose the Velocity option.
Now you are ready to use it and appreciate the differences in playing a note depending on how hard you press it.
A soft press will sound soft and a hard press will sound louder.
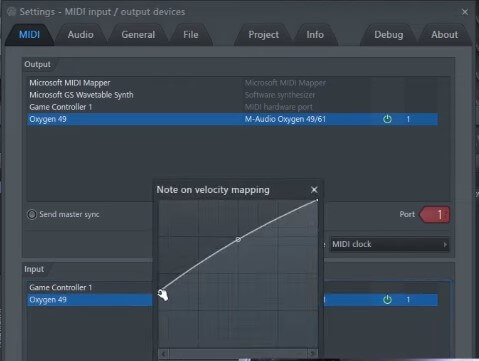
Another interesting trick is that you can play with Velocity’s mapping curve and make interesting settings with the input and output volumes.
Or simply invert the curve completely so that when you press a note hard you will get a low value, or if you press it softly you will hear a very loud output volume.
In essence, it is reversing the original operation of the input and output volume of this tool.
Velocity is useful when pressing a note that is too weak or too loud, so you can adjust the sensitivity by modifying the curve to values at which you can work more comfortably.
In case you want to disable this function, go back to Link Note On Velocity to, and select the None option.
On the other hand, if you want to have a better feeling when releasing a key you can modify the Link release Velocity to option, which will depend on how firm the keys on your keyboard are.
Modify it to your liking!
Also see: Get FREE sound packs for FL Studio
Mapping a MIDI keyboard
Here I am going to show you in a simple way the different situations and elements that can be mapped using a keyboard.
Using the synthesizer with a MIDI controller
A) Mapping over the synthesizer with the MIDI keyboard is very easy.
Go to the Channel Rack and select an instrument or simply choose the plugin of your choice on a channel.
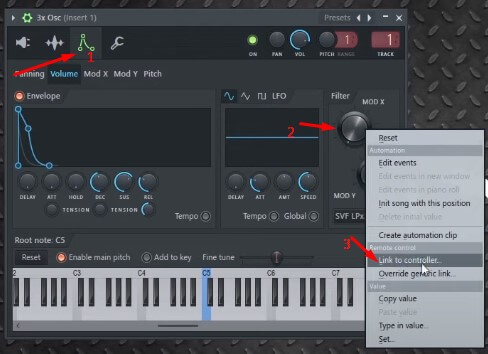
There you can choose the element to link, for example, a knob.
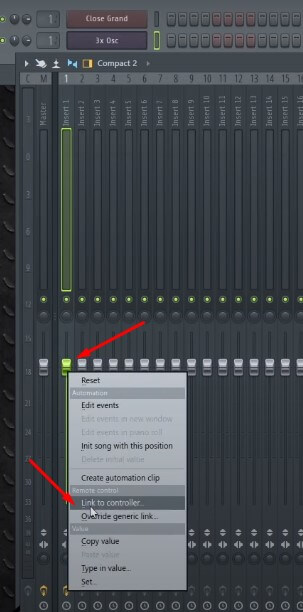
What you have to do is right-click on the knob and a contextual menu will appear, choose the Link To Controller option.
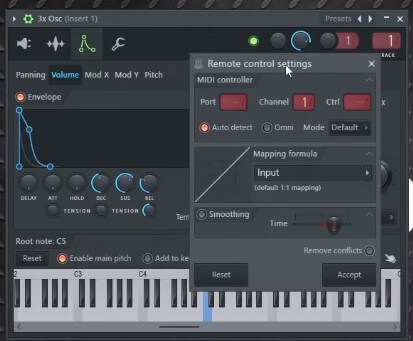
After that, a new window will appear (Remote Control Settings), and on the keyboard choose the hardware element that you want to link to this function.
You must move it or press it to automatically assign this control to your MIDI keyboard.
This way you can be playing notes or chords and at the same time with the other hand turn the control on your keyboard to achieve amazing sound effects.
If you want to deactivate this function and return everything to its original state, go back to the window where you have linked the function to your MIDI controller and press the Reset option and Accept.
B) Map several functions on the same control: To do this, you only need to repeat the steps mentioned above.
For example, right-click on a knob of the FL Studio synthesizer and access Link To Controller, and move the knob to configure it on your keyboard.
Now to attach another control to that same knob on the keyboard, right-click on it and open Link To Controller.
Finally, move the knob so that both functions are mapped to it. You will now be able to control both at the same time.
NOTE: To avoid issues, before mapping the second element you must make sure that the Remove Conflicts option is set to OFF. If this is on, only a single control can be mapped to the same MIDI keyboard controller.
C) Mapping Pitch and Modulation Wheels: MIDI keyboards usually come with these wheels and to set them up is the same as the methods explained above.
They are assigned by right-clicking on the element and choosing the Link To Controller option, moving one of the wheels, and accepting to complete the process.
D) Mapping Pads and keys of a MIDI Controller: It is done by repeating the process already explained using the Link To Controller option.
This method is very useful and offers us a great customization capacity which will allow us to have a more optimal workflow.
Also see: How to install FL Studio 20 on Chromebooks
Mapping Formula
It is the way FL Studio shows how it should behave with respect to the control it is inputting.
This function is very useful to manage in a more efficient way the automation clips and better control our musical projects.
It can be activated in a similar way to the previous one, just go to Link To Controller again and you can modify the mapping values of the formula.
This configuration is a bit more complex compared to the ones mentioned above and is recommended for more advanced users.
Using the Mixer with a MIDI controller
You can also map almost any keyboard element to this tool from pads, keys, buttons, or even faders.
- In order to set up a slider from your MIDI controller, you have to open the Mixer by pressing the F9 hotkey
- Select and right-click on the desired slider.
- A window with several options will appear and choose the Link To Controller option.
- Now you will be shown the Remote Control Settings window.
- Go to your MIDI keyboard and move the Fader to configure.
- Here it will be automatically recorded so that you can control that slider with a specific Fader on your MIDI controller.
Also see: FL Studio 20 VS Ableton Live – Which is the BEST option for you
How to record from a MIDI keyboard to FL Studio
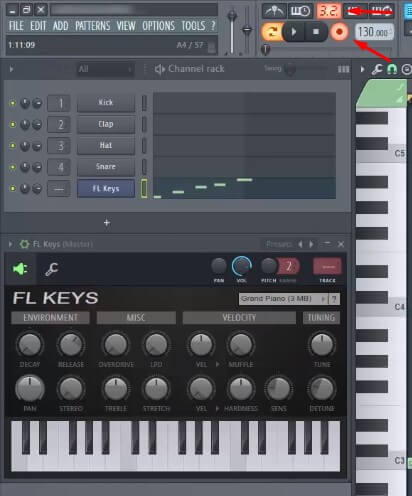
- For recording on a MIDI controller, first, you have to load a plugin (piano, guitar, or any other) in the Channel Rack.
- Then right-click on the record button located in the top panel.
- Verify that the notes option is enabled. If you want to use automation you can select it as well.
- Activate the tone counter by clicking on it (it is above the record button).
- Before continuing, make sure that the recording is activated, its icon should be red.
- Now play the notes on your MIDI keyboard that you want to record.
- Done, you have now recorded the notes played on your MIDI keyboard.
How to assign sounds or drum pads to FPC in FL Studio
For mapping pads, drums or any sounds, we will need to load the Fruity Pad Controller (FPC), which is an FL Studio stock plugin and is ideal for assigning the pads on a MIDI keyboard.
The idea behind this plugin is to load drum kits, singles, melodies, and other useful sound tools to produce beats.
To open the FPC we have to follow the next steps:
- The first thing to do is to open the FL Studio Mixer plugin.
- Then go to the upper left corner of the Mixer and click on the plus (+) icon.
- An options window will pop up and scroll to the Drums section.
- There you will see the FPC option and click on it to open it.
- Finally, the FPC plugin will be loaded and ready to use.
Each time you are pressing some of the pads of your MIDI controller the FPC will recognize which note you are playing.
However, you need to have it previously configured for this to work correctly.
So I’m going to show you how to do it and the FPC presets as well.
Assigning drum pads to FPC:
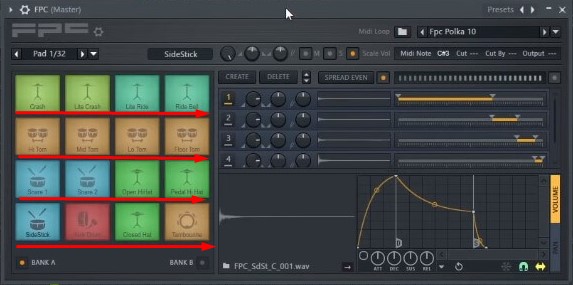
- Inside the FPC plugin, you must go to the section called MIDI Note.
- This is located at the top and to the right, click on it.
- In the new window that appears, look for the Map Notes for Entire Bank option and click on it.
- Now click on the MIDI keyboard pads to assign them to the FPC.
- Do this procedure in order and one at a time.
- The pads will be mapped to the FPC from below and to the right.
- This process will go up as the pads are mapped by the Fruity Pad Controller.
- After everything is mapped, go back to the Cancel Map Notes for Entire Bank option to stop the mapping process.
- Now, you are ready to use the Fruity Pad Controller.
Also see: Learn how to get FL Studio for Mobiles
NOTE: It is important to mention that, sometimes after finishing this process, some pads play two sounds at the same time. This is due to saving previous settings.
Solution:
You can solve this by tapping the pad on the note to be deleted, then going to the MIDI note option in the top panel and clicking on it.
Then move to the left and select the note called C0 to remove the value you don’t want.
That’s it, now all your MIDI controller pads are set up correctly. Each pad will have only one note assigned to it.
How to layer in FL Studio with a MIDI keyboard
Undoubtedly, this is a very useful feature, since you can assign several musical instruments to the different divisions of your keyboard.
Which means that you can play several instruments at the same time while playing the keyboard.
This is quite an interesting functionality.
To set up Layers on a MIDI controller follow this procedure:
- First, open the Channel Rack by pressing the F6 shortcut on your PC.
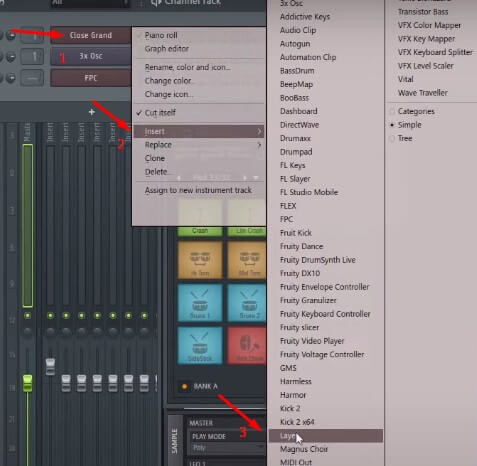
- Now right click on the Close Grand button.
- A menu of options will open and place the mouse cursor over the Insert option.
- Subsequently, another window will pop up and move to the option called Layers.
- As you can see in the Channel Rack a new button appears (Layers).
- Click on this button to display a window with its configuration options.
- Now in the Channel Rack, right-click on the channels you want to assign.
- Then, click on the option that says Set Children.
- Finally, octaves of your keyboard have been assigned.
As an example, you can assign two octaves of the MIDI keyboard that belong to the piano and the other two upper octaves to the synthesizer, each of which can be played separately with one hand.
But that’s not all, you can assign even more instruments to the octaves of your keyboard, such as string instruments, flutes, piano, synthesizer, or whatever you want.
Another interesting example is that you can go to the Close Grand and click on the tool icon.
Now below you will see a small keyboard, which you can select its keys with CTR+mouse cursor and choose a specific area of your MIDI controller to assign a special instrument or function.
Pretty nice!, isn’t it?
Also see: Copying and pasting shortcuts - Speed up your workflow in FL Studio
Final Thoughts
Remember that depending on how modern or complete your MIDI keyboard is, you will have more variety of note controls with special functions.
Such as buttons to save, record, play, pause, stop, switch between modes or vary the pitch of musical notes.
If you have a generic keyboard, some of these buttons may not work because they are not capable of being assigned notes or other specific functions.
One of the ways to deal with this problem is to know how to work with MIDI scripts and program them.
Something that is definitely complicated, I only recommend it to experienced users.
If you want to know more about this topic let me know by leaving a comment and I will be glad to help you.