It is common to see that many producers do not take advantage of the full power and functionalities of this DAW. It is possible that the same thing is happening to you and you don’t know it yet.
For this reason, I have prepared this guide to teach you how to set up FL Studio for beginners.
Here you will quickly learn how to set up FL Studio in the most important aspects.
In addition, I will show you the best settings based on my experience as a music producer.
I will also teach you how to set up the best audio settings and how to set up FL Studio for recording, so you can make songs like a Pro.
Do you want to produce high-quality music? I invite you to read on to learn all my secrets.
See also: How to Export Projects in FL Studio Like A Pro (Easy Guide)

Table of Contents
- How Do You Set Up FL Studio For Beginners?
- Extra Tips on How to configure FL Studio
- FAQs – How to Set Up FL Studio
- Sources
How Do You Set Up FL Studio For Beginners?
Knowing how to set up FL Studio correctly is vital to having the best user experience and streamlining your workflow.
So you can always create great beats and vocals that sound awesome and professional.
This basic FL Studio setup tutorial is useful for both beginners and more experienced users.
Everything you’ll see here I’ve been using for years and it’s worked pretty well for me.
To get started, the first thing you should do is go to the Global settings.
This can be done through the options in the Main menu or simply by using the F10 shortcut.
Once there, our goal will be to optimize the settings in FL Studio for external devices, set the best possible audio settings, reduce latencies and noise in the sound during production.
I will also teach you some tricks to make the CPU faster, know the best recording settings for different scenarios, and many other things.
From now on I tell you that all this process can be applied on Windows OS and macOS computers.
Are you ready? Let’s get started!
1. MIDI device configuration
From the MIDI tab, you can manipulate and set up connections to use almost any MIDI controller on the market.
The DAW comes with a long list of supported devices and their respective drivers.
Also, if you need to fine-tune any detail so that the hardware connected to your PC is recognized in this tab you can achieve it.
If you want to know more about this topic I invite you to read my article on How to Use any MIDI Controller on FL Studio in a professional way.
In case you don’t have any external keyboard you don’t have to modify anything in this field.
2. Adjusting the best audio settings
Undoubtedly, one of the most important things to do in any Digital Audio Workstation is to know how to properly configure its audio settings.
But unfortunately, not everyone knows how to achieve the best results.
For this reason, I will show you how to set the best audio settings for FL Studio 20 in a few simple steps.
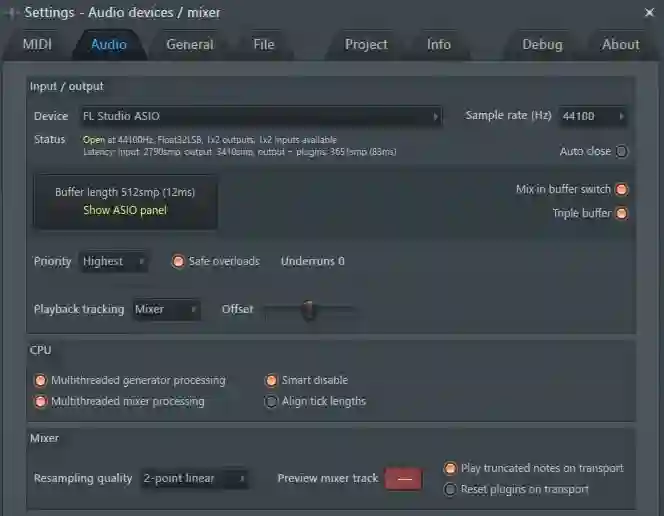
The window where you can manage this is called Audio Tab.
How do I improve the sound quality in FL Studio?

One of the most effective ways to considerably improve the sound quality is to optimize the latencies.
Latency is defined as the time it takes for the PC to process the action generated by the music production software as you hear it.
It also plays a major role in the speed of sounds captured by input devices such as microphones, guitars, pianos, MIDI controllers, etc.
In short, low latency goes a long way in producing excellent sounds.
Step 1. Select the sound device
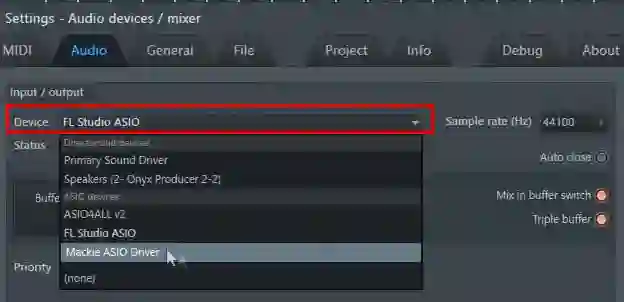
In this box, you have to choose the device or element through which FL Studio is going to produce the sound.
On the other hand, here you can also set the Sample Rate (Hz). The ideal is to use a standard value of 44100, which is more than enough for most projects.

The main audio settings are as follows:
- FL Studio ASIO: It is a native FL Studio driver that allows us to delay latency and helps a lot to make everything sound more fluid and natural, especially while playing audio from streaming platforms. It is the driver that I recommend to use for most of the cases that we make songs in FL Studio.
- ASIO4ALL: This is another driver that comes included with Fruity Loops and is necessary for its proper functioning. ASIO4ALL will concentrate and process all the audio generated by the computer directly in the DAW.
This helps greatly to reduce the latency between the devices connected to the PC and FL Studio, so you can always get the best possible audio quality in your project.
Recommended: Check out my guide on How to Use and Configure FL Studio ASIO and ASIO4ALL to get the best sound fidelity. I also show you how to get both software for free in case you don’t have them.
- Sound card or audio interface: If you have one, in this section you can locate and configure its driver to be recognized by the production software.

So, How do I configure the drivers of my sound card or audio interface?
Basically, what you should do is to choose the driver corresponding to your hardware, instead of using the generic software that comes by default in the DAW.
Personally, I always recommend using official sound drivers. You can download and update them from the device manufacturer’s website.
By doing this you will have superior audio quality and lower latencies.
Pro Tip: If you have an audio card or a sound interface and you don’t have its drivers, I suggest you always choose the ASIO4ALL driver. It will handle and process all the audio from the audio outputs more efficiently.
Step 2. Buffer length and CPU optimization
What is buffer size?
It is a portion of the PC’s memory where data is temporarily stored. In the case of Fruity Loops, it stores all the sound information generated by the Digital Audio Workstation.
The main function of the buffer length is to increase the sound quality in exchange for an increase in the processor load.
This means that the audio fidelity, user experience, and DAW smoothness will improve considerably at the cost of a higher CPU usage by reducing the buffer size.
Below are some tips on how to set the best buffer size (to reduce crashes, lag, screen freezes, clips, etc):

- Mix in Buffer Switch and Triple Buffer: Both features should be enabled to reduce CPU and RAM usage. In a nutshell, enabling them helps the computer to increase its performance and make everything run smoother.
- Enable Safe overloads: This allows you to work safely by avoiding/reducing FL Studio and computer CPU overloads. This is one of the most effective ways to avoid annoying clips or strange sounds while you are working on a large project with many elements simultaneously.
Improve CPU performance by enabling the following options:
- Priority: It is recommended to set this to Highest.
- Multithreaded generator processing: ON
- Multithreaded mixer processing: ON
- Smart disable: ON

It is important to know that the optimizations of the buffer length, CPU, Mixer, and recording settings are linked to each other.
So the correct optimization of each of them will guarantee the quality of the final result of this whole process.
Step 3. Setting up FL Studio for recording
The recording is one of the most used and valued tools in the world of music creation and this program does it very well. This DAW stands out for the versatility and power of its VST plugins.
If you want to get perfect-sounding recordings I suggest you apply the following tips that as an experienced producer have helped me a lot.
These settings will help you to have no latency when recording or at least reduce it as much as possible.
Best settings for recording in Fruity Loops:
- For professional recordings lower the buffer to the minimum: Using a buffer size of 256 smp allows us to capture better-achieved sounds and especially helps us to produce high-quality vocals. This is achieved through a process of latency reduction which allows us to hear ourselves better. The downside is that it strongly increases CPU consumption and reduces interface fluidity if your pc is limited in resources.
- It is useful to use ASIO4ALL to make recordings of any kind of sound coming from streaming services (Youtube, Twitch, Soundcloud, etc).
- Use a buffer length at an intermediate point if you are not recording. The larger the buffer size, the more latency Fruity Loops will have and the lower the CPU usage. A good range of values is between 512 and 1024 smp.
- If you are going to use an audio card when recording vocals, always choose its corresponding driver to eliminate latency and increase fidelity. On the other hand, if you don’t have one I suggest selecting ASIO4ALL, as it does a pretty decent job although with a bit of latency.
- Avoid using the primary drivers to capture sound, as their performance is inferior.
See also: How to Use FL Studio Make Unique (Like A Pro)
Step 4. Mixer optimization
Resampling quality: Modifying this value allows the program to increase its fluidity at the cost of reduced sound fidelity.
I recommend using 6-point Hermite for low-power PCs.
Although, it is good to adjust this value to your preferences and test which value works best for you.
On the other hand, if your computer is high-end and has a good processor, the ideal is to use 24-point sinc to obtain higher quality and more professional audio.
3. General settings
GUI display
In this field, you modify everything related to the appearance of FL Studio’s interface and its VST plugins, as well as its on-screen animations.
That is, you can change the aesthetics of the DAW to your liking, deactivate animations.
And also change the size of the plugins and adapt them to your workflow, and adjust the element you want to the size of your monitor.
Here you can also change the default FL Studio template and use custom templates instead.
I recommend not to touch anything and keep the default values.
Language settings
As its name says, it allows us to change the language settings of the program.
You need to keep in mind that the interface language is linked to the language of your computer’s operating system.
In other words, if you change the language of your computer, so will FL Studio.
However, from the DAW itself, you can force and assign a different one to the O.S. if you wish.
Undo history
This feature refers to the number of times you can use undo to undo changes to the project you are currently working on screen.
Depending on the numeric value you set it will control the number of times you can use CTRL+Z.
Set the value according to your preference. Just avoid using a number that is too small or, on the contrary, one that is too large.
This is useful to prevent overloading the computer.
If you wish you can leave it as default.
- Undo Knob tweaks: This tool is used to undo changes made on the knobs of the DAW and its plugins.
Based on my experience I can say that it is a very practical utility.
It is good to speed up and improve your skills during production.
So I always recommend to have it activated.
Updates
By enabling this option you can receive automatic program updates. This option will depend on you if you enable it or not.
In my opinion, it is better to remove it and update the application manually.
This way you will have control of which version of the application you want to install, thus avoiding auto-installing updates that make FL Studio unstable or any of its plugins stop working.
GUI input
Changes the behavior of the mouse and its buttons in different scenarios or areas of the music production software.
I suggest you use its default values.
Others
You can leave the values of the following tabs as they come with the program when you install it:
- Warnings
- System
- Advanced
- Miscellaneous
However, these can be modified depending on your way of working and the requirements of your project at any given time.
4. File configuration
Here you can configure your external tools, sound libraries (in case you have some downloaded) and manage your plugins.
The settings made here will make these items show up in the Fruity Loops Browser, making everything easier to access.
See also: FL Studio: How to Install/Add VST Plugins On Any Mac
Also in this section, you can adjust the frequency of auto savings, which is one of the most important parts of using the software on a recurring basis.
You can leave everything as it is when you install it.
5. Info settings
This area is one of my favorites, as you can assign the metadata related to the project or song.
Completing the fields will auto-assign the values and information to the songs produced in the Audio Digital Workstation.
What is this data? I show them below:
- Title
- Author
- Musical Genre
- Comments
Labeling the projects or songs made in FL Studio with their correct title and author will allow you to have all your files more organized.
You can also avoid missing something or perhaps not having headaches to find what you are looking for.
Being organized is an essential habit that every song producer should encourage.
Speaking of the genre tag, the DAW has a long list of music types, so it won’t be hard for you to find the one that best suits what you want to create.
Assigning a comment is useful for adding notes or to-do lists on certain elements that are pending modification or correction in your current project.
This way you won’t forget any detail, since when you open the work file a notification will open informing you of everything you need to do.
It is one of my favorite tools without a doubt.
Also at the bottom of this section, you can see all the data of the time spent on the project you are working on, that is to say, when it was started and its progress.
It is a functionality that some people don’t like, but I do.
I consider it very interesting since it allows me to know how much time and effort I have put into making a song or finishing an assignment.
6. Project settings
Actually, in this tab, you don’t have to make any changes.
You only need to know that here we are allowed to change and adjust the Time Signature, which may vary according to the project we are working on.
On the other hand, you can also modify the PPQ value.
I will talk about this in future tutorials on advanced settings and optimization of FL Studio.
Extra Tips on How to configure FL Studio
Watch this video where everything is explained in more depth
FAQs – How to Set Up FL Studio
How do you set up FL Studio on Mac?
Actually, the DAW settings on MacBook devices are almost no different from Windows. Practically, FL Studio works with the same settings on both operating systems.
There are only a few exceptions in this regard, such as the case of the audio output settings and the use of ASIO drivers.
How to choose my buffer size in FL Studio?
Press F10 to open the General settings and go to the ”Audio tab”. There you must select the FL Studio ASIO driver in the device settings.
Then, click on the ”Buffer Length” checkbox to display the corresponding size options in the ASIO panel.
Finally, choose the size that best suits your project requirements.
What buffer size should I use in FL Studio?
The buffer size to use will depend on the scenario you are working in and the power of your PC.
For audio recordings, values below 512 smp are recommended for higher quality, while for large projects it is recommended to use a maximum buffer size to ensure greater stability.
If no audio is being recorded, an intermediate value is ideal.
On the other hand, for high-end computers, it is highly recommended to use minimum buffer values, as they can handle the workload well.
In contrast, low-resource PCs and large projects should use high buffer sizes.
How to add comments to my FL Studio project?
To assign comments to a project you have to open the General settings by pressing F10 and go to the Information tab of the music production software.
How to change the signature in FL Studio?
To change the signature values go to the ”Project Settings” tab in the general settings.
There you can change the time signature according to the rhythm of the song.
How to set FL Studio to default settings?
Currently, there are two ways to reset the audio settings to their initial values.
A) The first method is to use the ”Diagnostic Tool” located in the ”Help Menu”.
Once there, close the DAW and click the ”Reset FL Studio settings option” button to return to the default settings.

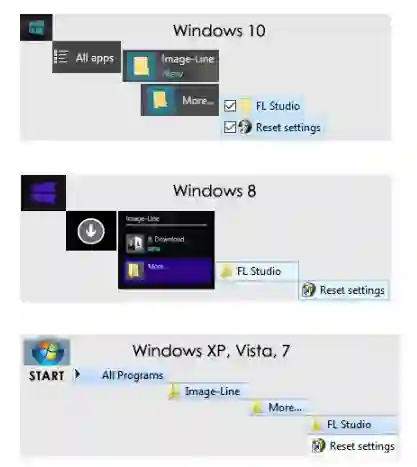
B) The second way is through the Windows Start menu.
Open this menu and type the word ”FL Studio” in its search engine and a folder with the same name will appear.
Finally, open it and click on the file called ”Reset settings” to start the restore process.
What language does FL Studio use?
The default language of the DAW is English.
However, FL Studio and its user manuals are also available in additional languages, such as French, German, Spanish, and recently added Chinese.
Sources
- https://www.image-line.com/fl-studio-learning/fl-studio-online-manual/html/envsettings_midi.htm
- https://www.image-line.com/fl-studio-learning/fl-studio-online-manual/html/envsettings_audio.htm
- https://www.image-line.com/fl-studio-learning/fl-studio-online-manual/html/envsettings_general.htm
- https://www.image-line.com/fl-studio-learning/fl-studio-online-manual/html/envsettings_files.htm
- https://www.image-line.com/fl-studio-learning/fl-studio-online-manual/html/app_reset.htm
