It is important to mention that these tips to change the size and appearance of plugins can be used on both Windows and Mac. This also works in FL Studio 12, 20 or higher.
See also: Most Frequent Errors In FL Studio DAW (SOLVED)
Table of Contents
- How to Make Plugins Smaller or Bigger in FL Studio
- Extra Tips
- FAQs – Resize plugins in FL Studio
- Sources
How to Make Plugins Smaller or Bigger in FL Studio
Before we start, I would like to point out that each of the methods I will show you below should be applied in a particular way, depending on the problem you are having in your DAW.
Basically, some of them are useful to learn how to make plugins smaller, while others are useful to make them bigger when working in FL Studio.
So if you want to know how to easily fix when plugins are too small or too large I invite you to continue reading this post.
1. Make Bridged to resize plugins
This Fruity Loops utility allows us to resize almost any external plugin, which makes it a very useful tool.
Especially when the VST window is too big for the screen and covers a large part of the DAW interface, thus making it very difficult to appreciate all the functions.
An ideal scenario where we can use Make Bridged is when an external plugin does not allow us to resize it initially. So we can then change the window and make the plugins smaller or larger.
How to use Make Bridged:
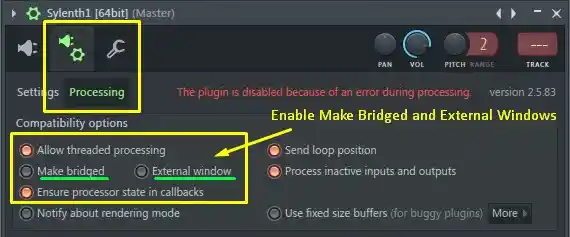
- Open the external plugin in the DAW
- Click on the gear (top left corner)
- Select the tab with the ”plugin and nut icons”.
- Then click on ”Processing”.
- Turn on the options ”Make Bridged” and ”External Window”.
- Return to the external VST
- Finally, now you can make it smaller or larger
2. PC screen too small
The smaller your screen is, the more difficult it is to appreciate the details of the DAW tools. A computer with a small screen makes it more difficult to use certain software utilities no matter how much it is rescaled.
As you continue to reduce the element size it will get to a point where everything will look bad and tiny, thus affecting your user experience. Remember that making plugins too small is a bad idea.
That’s why to have a good workflow while working, the right thing to do is to use a large monitor size.
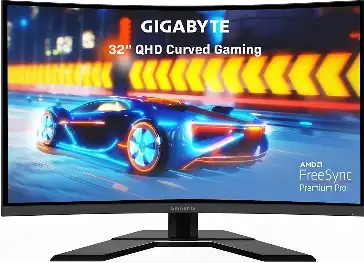
GIGABYTE G32QC A 2560x1440p (2K) 165 Hz
Item description
- Native 1500R Curvature
- Smooth Gameplay with AMD FreeSync Premium Pro
- VESA display HDR400 and 93% DCI-P3
- GIGABYTE Classic Tactical Features with OSD Sidekick
- 32” 2560×1440 (2K) VA Display with 165Hz Refresh Rate, 1 ms Response Time
This way, the plugins will not look too big in the FL Studio GUI and will keep their ideal size.
From personal experience, I recommend not to use screens smaller than 13 inches. If you are using a laptop, 15 inches or larger is the optimal screen size to use.
On the other hand, for desktop computers, the best experience is obtained from 21 inches onwards.
In my current setup, I use a 32-inch monitor at a resolution of 2560x1440p 165 Hz and it works great, since I can appreciate every detail of what I am viewing easily, without any effort.
Plus with that large screen, I can use it split while working with multiple tools, which makes things faster and more efficient. The bigger the screen, the more items we can work with simultaneously.
It is literally a delight to use this type of monitor.
Hey, wait! Are you interested in getting a better monitor than mine? I have good news for you. It’s a 4k monitor with better picture quality and specifications at a bargain price. Don’t miss the offer!
Also, if it is within your possibilities, you can use two or three monitors to create music. This means that on the main screen we will be watching the Playlist, on one the Mixer, and on another the Channel Rack, just to mention an example.
3. Set FL Studio to full screen
This step is easy to apply and there is not much to explain. Basically, it consists of expanding FL Studio to full screen when using a computer with a few inches screen and low resolution.
How do I make FL Studio full screen?
To enable full screen you have to execute the keyboard shortcut ”Alt+Enter” on computers with Windows operating system.
While on macOS you must go to the general settings panel and enter into Dock & Menu Bar. There you must enable the options ”Autohide” and ”Dock option in the new window”. This way the screen will look as big as possible.
See also: FL Studio Out Of Memory? Allocate More RAM (Easy Guide)
4. Use FL (Scaled)
FL (Scaled) is a tool designed to allow FL Studio to do high-resolution rescaling. In other words, we can make VST plugins look better when they are too small or too big on the display.
This utility has two versions:
- FL (Scaled).exe: For 32-bit computers.
- FL64 (Scaled).exe: Useful for computers with 64-bit architecture.
Important: Computers with macOS operating system are incompatible with FL (Scaled). It is only available for Windows devices.
Here is a very complete video tutorial where everything is explained in more depth. Don’t miss it!
5. Readjust the FL Studio GUI Display
This is a feature that allows you to set the size of the DAW interface elements. To use it you must go to the menu and enter ”General Settings”.
It is always a good practice to use the GUI when plugins are not scaling properly. This is one of the best options for resizing VST software.
Increasing the resize values will allow us to make the plugins larger instantly.
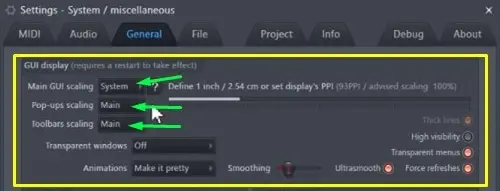
To correct the errors you should try to use the following values:
- Main GUI Scaling: ideally keep it at System, which is the default value. This way, FL Studio will apply the configuration of the screen we are working with (using the native resolution is the most recommended). Otherwise, choose 100% if we want to use a non-native desktop resolution.
- Pop-ups Scaling: It is in charge of rescaling the menu, isolated elements, or plugins. It is recommended to leave it on Main or 100%, this way we will make FL Studio plugins look smaller compared to the other options.
- Toolbar Scaling: It is used to readjust the dimensions of the toolbar located at the top of the DAW. Its ideal value is Main.
Note: For these changes to be applied you must restart the program.
It is important to note that very few stock plugins within this DAW can be rescaled. And to be honest there is no VST that can be made smaller in FL Studio with respect to the layout assigned by Image-Line (the developer).
A clear example of this is the Harmor plugin, which lacks the option to resize. In contrast, tools such as Sytrus does have a resizable interface and therefore the plugin window can be made larger.
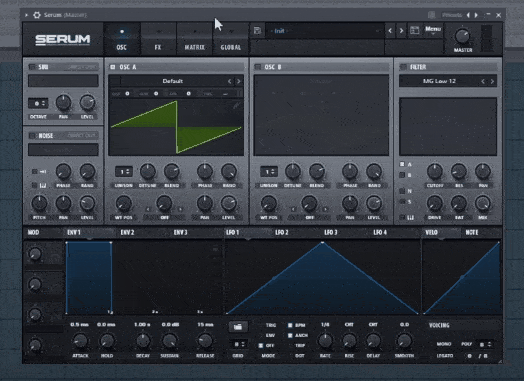
On the other hand, some tools created by third parties can make the window smaller while being used in FL Studio, such as Serum.
6. Optimize the PC’s display settings
Why does everything look so big in FL Studio? This is a common configuration problem among users of this music production software and the number one cause of this inconvenience is related to the screen resolution of our PC.
That is to say, the lower the screen resolution, the bigger all the elements of the DAW graphical interface will look, affecting all its VSTs.
On Windows, you must go to the screen settings panel to fix this error. If you are a macOS user, you will see the ”Display” option in the settings and the essence of this procedure is practically the same for both operating systems.
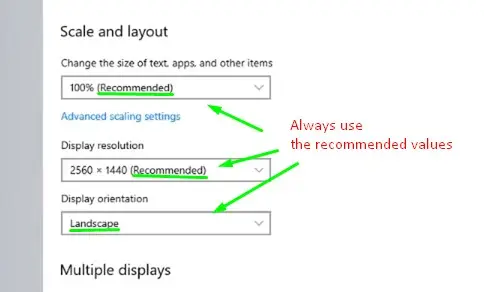
- Press the Start key and in the search bar type ”Display Settings”.
- Click on the monitor icon to open the panel.
- Locate ”Scale and Layout” to make the settings according to your monitor.
- Set the size of the elements on the screen to 100%.
- Use only the ”Resolution (Recommended)” for your monitor. Never choose values higher or lower than the native resolution.
- Make sure the monitor orientation is ”Landscape”.
After the changes are applied it should automatically fix FL Studio and everything will stop looking too big.
Extra Tips
Here is a video tutorial showing more optimization tips that you might find useful. This way you will have more alternatives available to solve the problems to make plugins smaller or bigger in FL Studio.
I recommend you to watch it, you won’t regret it!
See also: Are FL Studio Stock Plugins Good for Making Music?
FAQs – Resize plugins in FL Studio
Why are my plugins small in FL Studio?
It is common to see plugins displayed too small in FL Studio when using the wrong resolution on the computer desktop or when they are being forced to be resized to a smaller dimension than recommended by the developer.
How do I resize a plugin window?
The easiest way to resize a plugin window is through re-scaling methods. These are very varied and will depend on the DAW, the VST, and the computer’s operating system.