The Fruity Compressor is one of the most popular plugins among FL Studio users to get more pleasant and professional audios, and it is important that you know how to configure the Fruity Compressor settings to make your vocals sound perfect.
Compression is a vital process in music production and that’s why it is considered one of the most used sound effects to get more modern and well-done vocals.
In this post, I will also show you how to use the Fruity Compressor so you can enhance your vocals and sounds like a pro.
See also: 10 Best FL Studio Stock Plugins You Must Use
Table of Contents
- What is FL Studio’s Fruity Compressor?
- What does a compressor do for vocals?
- How do you use a Fruity compressor in FL Studio?
- Best alternatives to Fruity Compressor
- FAQ – Fruity Compressor on Vocals
- Sources
What is FL Studio’s Fruity Compressor?
The Fruity compressor is an FL Studio VST plugin that is used to apply sound effects through the process of dynamic compression of audio waves, which is useful to give an extra boost to kick drums, make the bass more powerful, enhance vocals and make the final result of the sound mix hear much better.
This VST compressor is suitable for use on almost any audio or instrument be it melodic, drums, percussion, kick drums, bass, etc., or also in mixing, vocals, or during the mastering process.
It has controls that relate to each other in order to obtain a balanced result between input and output volume.
These adjustable knobs have the ability to limit frequency peaks, which is useful in high-quality integrated vocal recording. It is a tool with basic features for processing individual audios on mixer tracks.
See also: Trap Music: 10 Best FL Studio Stock Plugins
Actually, these compressor controls are an excellent choice!
Main Presets of Fruity Compressor
It is important to keep in mind that the purpose of compression is to manage the automatic gain that minimizes the range of sounds.
The configuration of the compressor settings is all about adjusting the speed, magnitude, and timing of the gain in the recording.
If you want to know how to use the presets, I recommend that you look at the following settings.
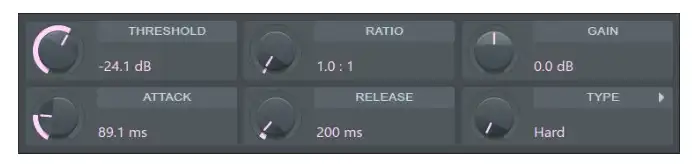
1. Threshold: It is in charge of setting the dB or decibel level at which the compressor should start working.
It ranges from 0.0 to -60.0 and should be set according to the relative input level and type of hearing material.
When the threshold value has been set, compression begins and the gain in the input signal is minimized according to the ratio, type, release, and attack parameters.
2. Ratio: This is the element in charge of controlling the compression intensity or gain reduction that will be applied to the signal once the threshold value is set.
Its range is between 0.4 and 30:1. Depending on the input and output level, the Ratio will compress or amplify the ratio below 1:1, but this value may be different for each vocal recording.
3. Gain: This is the element that manages the amount of gain that will be added to or removed from the compressed output signal.
Its value ranges from 30.0 to -30.0 dB. This is adjusted in order to systematize the amplitude of the signal after compression or limiting adjustment.
See also: How To Get Omnisphere 2 VST Plugin On FL Studio 20
4. Attack: This is responsible for managing the time it takes to complete the compression once the threshold value is exceeded.
The attack is set according to the type of hearing material you use. Its range varies between 0.0 and 400.0 ms, with 2 types:
- Fast: Refers to the compression will be instantaneous.
- Slow: Compression is increased gradually, allowing more variation in the signal.
5. Release: It is in charge of setting the time it takes for the compressor to stop working after the level drops below the normal threshold. Its value ranges from 1 to 4000 ms.
There are short release times, in charge of making the compression more flexible and adapting it to the input signal.
There are also extended release times, which generate a signal with a uniform value, with little distortion.
6. Type: It is a function that manages the knee type or value that measures the compressor reaction of the signals then interacting with the threshold.
It works with different values such as medium, hard, soft, and vintage. The knee marks the dB value above and below the threshold when the compression changes as you set it in the recording.
In addition, uses different types of knee in compression. It can be smooth or gradual increase of not compressing until the input volume is raised.
Also, it can be difficult if the uncompressed transition is automatic when the input level is exceeded.
What does a compressor do for vocals?
One of the most commonly used methods to make vocals sound more professional is through the use of compression plugins, which apply effects to enhance, saturate and enrich vocals to make them hear better. Thus eliminating as many imperfections as possible.
See also: Get FLEX VST Plugin FREE: Packs/Libraries FL Studio
Best Fruity Compressor settings for vocals
It is common to see almost daily many new producers asking in communities or forums: How can I make vocals sound better, how can I compress them easily without losing quality, and what are the best settings for compressing vocals?
Unfortunately, the answer is not that simple, since everything will depend on several factors, such as the type of voice and its pitch, the person singing (man, woman, or child), the genre of the music to be produced (rap, trap, hip hop, rock, pop), among other elements.
In reality, there are no pre-designed settings that help to compress vocals with Fruity Compressor in a simpler way.
There is no shortcut, no magic formula, no ideal values.
This is a dynamic process that requires practice and some knowledge of how a compressor plugin works in the audio waves. You have to know what to optimize, what to eliminate or reduce the gain, to mention several examples.
The most optimal solution to produce professional vocals is to learn how to use this tool. And that’s why below is a tutorial on how to use Fruity compressor on vocals in a professional way:
When to use Fruity Compressor on vocals?
The Fruity compressor is ideal for producing high-quality commercial vocals, which helps to give a unique and individual treatment to each sound, resulting in more professional vocals.
Here are the best scenarios to use it in.
The Fruity compressor on vocals can be used for:
- To compress individual vocals on a track.
- To control and regulate abrupt changes in volume
- To make vocals louder and sharper
- To give the voice more character
- To enrich and enhance vocals
- To make them more pleasant and not sound amateurish
How do you use a Fruity compressor in FL Studio?
In the following tutorial, you will learn how to use the basic functions and techniques of the Fruity Compressor. This is a practical guide where you will be shown in a simple way how to apply the compression method easily.
In this way, everything you learn here will help you to master most compression plugins in almost any DAW.
See also: What Plugins Come With FL Studio Producer Edition?
How to use Fruity compressor:
Step 1: The first thing you should do is set the Compression Ratio, which could be around 3:1 to start with.
Step 2: Adjust the Threshold negatively until you get about -10 dBs of gain.
Step 3: Be aggressive on the Attack Time and try to keep it around 100 ms.
Step 4: Then set the Release knob to get a time that is fast (5 ms).
Step 5: Move the Attack knob again, reducing the values until the audio starts to be somewhat dull and colorless.
Step 6: Modify the Release again until the compressed sound reaches the rhythm of your beat. You can play around with this and keep it between 50 -150 ms.
Step 7: Use the Threshold to get a thicker and more powerful sound. Try not to overuse this effect too much.
Step 8: Readjust the Ratio again until you find a sweet spot. You can try lowering it to reduce the compression level, or you can increase it to be more aggressive if you wish.
Step 9: Finally, use the Knee Type to control the level of compression application. This can be Hard (0 dB), Medium (6 dB), Vintage (7 dB) and Soft (15 dB).
Best alternatives to Fruity Compressor
In the market, there is a great variety of excellent quality and affordable compressor plugins useful for processing vocals, as is the case of the amazing Sausage Fattener.
However, if you are a Fruity Loops user you can use several VST plugins to compress your vocals for free.
See also: FL Studio: Install and Add Izotope Vinyl (Step-By-Step)
Free VST plugins alternative to FRUITY compressor:
- Maximus: It is one of the best Fruity Loops compressor plugins that stands out because it is complete and versatile. It is composed of multiple bands, with which you can also limit and maximize almost any sound.
- Fruity Limiter: It is a very popular VST among Fruity Loops users and serves to limit and compress audio through its visual and modern interface. It is one of the best alternatives to Fruity Compressor.
- Fruity Multiband Compressor: This plugin is a multiband limiter and compressor, which works very well in compressing tracks during mixing and mastering.
- Soundgoodizer: It is a simple-to-use maximizer, inspired and powered by the processing engine of the wonderful and popular Maximus.
FAQ – Fruity Compressor on Vocals
Is the Fruity compressor good?
The short answer is yes. The Fruity compressor is considered one of the best legacy plugins in FL Studio.
Should I use a compressor when recording vocals?
Definitely yes. Using a compressor on vocals is one of the best ways to produce powerful and professional vocals.
How do I make vocals better in FL Studio?
The easiest way to make vocals sound better and more professional is to use the effects of a compressor plugin on them.
What are the best compressor KNEE types for vocals?
There is no ideal compressor KNEE type for vocals since compression is a dynamic process and varies a lot due to different factors. Therefore the values must be adjusted individually according to the type of voice and the rhythm of the song.
Should I put a compressor on every track?
The short answer is yes. Using a compressor is considered a good practice for making high-quality music. However, you should be careful and use it only when necessary to avoid ruining the track.
See also: FL Studio 20: Install Nexus Plugin, Expansions, And Presets
Sources
- https://www.image-line.com/fl-studio-learning/fl-studio-online-manual/html/plugins/Fruity%20Compressor.htm
- https://www.image-line.com/fl-studio-learning/fl-studio-online-manual/html/plugins/Maximus.htm
- https://www.image-line.com/fl-studio-learning/fl-studio-online-manual/html/plugins/Fruity%20Multiband%20Compressor.htm
- https://www.image-line.com/fl-studio-learning/fl-studio-online-manual/html/plugins/Soundgoodizer.htm
- https://www.image-line.com/fl-studio-learning/fl-studio-online-manual/html/plugins/Fruity%20Limiter.htm
- https://en.wikipedia.org/wiki/Loudness_war