Are you ready to take your music production to the next level? Get ready for a revolutionary approach to editing, mixing, and sequencing with FL Studio Performance Mode!
This powerful feature allows producers to perform real-time audio manipulation for faster editing with an intuitive user interface.
In this article, I’ll break down everything you need to know about FL Studio Performance Mode.
Table of Contents
- What is FL Studio Performance Mode?
- How to Use the Performance Mode in FL Studio?
- 5 Tips and Thricks for Using the Performance Mode
- Final Thoughts
- FAQs
- Resources

What is FL Studio Performance Mode?
It enables performers to connect various devices and sound modules together in a logical manner, so they can be programmed directly during live shows.
In other words, you can trigger loops, one-shots, and patterns in real-time, which makes it ideal for live performances, DJ sets, and studio sessions.
The software also facilitates MIDI remote control from USB controllers and other MIDI compatible hardware, which makes it easier for musicians on stage or in the studio.
With features like MultiFX racks, automatable clips/scenes/patterns and integrated cue playback system, users are able to make their music come alive onstage or in their DAWs like never before.
How to Use the Performance Mode in FL Studio?
It’s all about combining the power of Fruity Loops with live instruments, hardware or software synthesizers, drum machines and effects.
Using your mouse and keyboard, you can layer musical elements in real-time, record MIDI notes into the mixer to create powerful builds and drops, and even turn knobs on external devices directly from inside FL Studio’s interface.

Using FL Studio Performance Mode is simple! Just follow the next steps:
1. Connect your synth module (or other device) outputs into one of the inputs of your audio interface. You have to set up your controller before to continue with the next step.
2. Open up your project in FL Studio. Then go to the main menu, Tools, Macros, and click on “Prepare for Performance Mode” to turn on the feature.
Important: Be sure to make a backup of your project before continue, because this process cannot be undone.
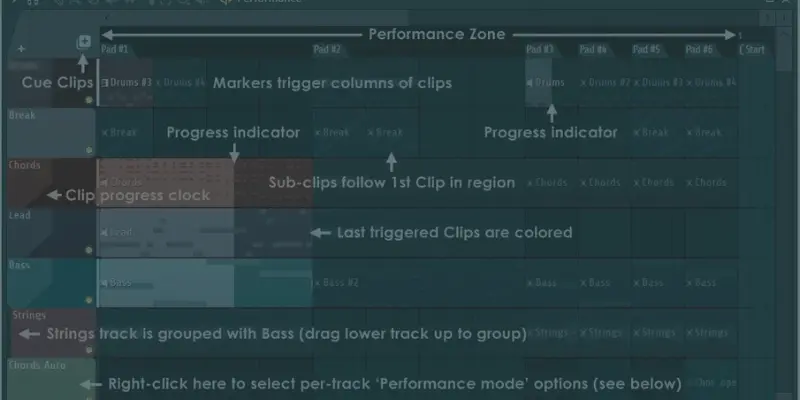
3. Now drag as many elements as you need onto your Playlist. These could include synths, consolidated audio clips or samples that you’ve loaded into your project.
4. Finally, on the Playlist, assign each marker its own pad by mapping your MIDI Keyboard. Now that all of our connections are established, you can start performing live!
5 Tips and Thricks for Using the Performance Mode
If you master the following tips to perfection, you will be able to create tracks quickly and professionally.
You will also be able to produce modern and interesting songs that will capture the attention of your audience.
1) Familiarize yourself with all the shortcuts. This will save time when programming during performances!
2) Utilize automation whenever possible: Automating parameters within scenes ensures to add depth and complexity to your tracks, create dynamic and evolving arrangements, which allows you to make your music sounds better and more professional.
3) Take advantage of external hardware integration: Connecting controllable hardware can make things easier and more intuitive.
Consider investing in a good MIDI controller to take full advantage of this cool feature.
4) Organize Your Clips: It’s necessary to organize your clips in a way that makes sense to you. This action will help you to be more productive and increase your workflow.
5) Experiment and practice to find the best method: The more you practice, the more you will develop skills that will be useful during your live performances.
This definitely makes the difference between the Pro and the novice.
Don’t fall behind and try to learn as much as you can. Take advantage of the free tutorials you can find on YouTube.
Final Thoughts
FL Studio Performance mode is an incredibly versatile tool designed specifically for performers looking to take their sets beyond traditional instrumentation bounds.
This handy feature is extremely useful for DJs and parties and allows you to trigger and control multiple clips, patterns, and automations simultaneously via the computer keyboard or a MIDI controller.
I recommend that you master this mode as much as possible so that you can get the most out of it and create dynamic and engaging tracks that will leave your audience wanting more!!
FAQs
Can I use Performance Mode in FL Studio’s mobile app?
Unfortunately, this feature is not currently available in FL Studio’s mobile app.
Do I need a MIDI controller to use Performance Mode?
While you can use your computer keyboard to trigger clips and control parameters, using a MIDI controller can make things easier and more.
How can I save my Performance Mode setup for future use?
To save your Performance Mode setup, you can create a new project file or save the Performance Mode as a preset.
Can I use Performance Mode in a live performance?
Yes!, you can use FL Studio for live perfomances. In fact, Image-Line developed this mode specifically for live events, making it an ideal tool for DJs and live electronic music performers.
Is Performance Mode easy to learn?
Yes, it is. With practice and experimentation, you’ll quickly get comfortable with using it and discover the possibilities it offers for your live performances.
Is FL Studio good for live performance?
Definitely yes. The DAW comes equipped with the necessary tools to make music during live shows.
Does FL Studio have a performance mode?
Yes, Fruity Loops comes with this functionality in all editions of the software.
How do I turn on and off the performance mode in FL Studio?
To activate it go to the Tools section of the main menu and under Macros choose the “Prepare for Performance Mode” option. And in order to exit performance mode just press the keyboard shortcut CTRL+P.
Resources
- Consult the official manual
